
Try it
  • Examples
  • Features
  • Testimonials
  • Partners
  • Pricing
  • Support
    • Apps Help
    • Apps Release History
    • BI Help
    • BI Release History
    • Forms Help
    • Forms Release History
    • How to video series
    • Ask the community
    • Submit a ticket
    • Request a demo
    • Compare us
  • Blog
  • Examples
  • Features
  • Testimonials
  • Partners
  • Pricing
  • Support
    • Apps Help
    • Apps Release History
    • BI Help
    • BI Release History
    • Forms Help
    • Forms Release History
    • How to video series
    • Ask the community
    • Submit a ticket
    • Request a demo
    • Compare us
    • For Schools
  • Blog
  • Get Started
How can we help?

Search for answers or browse articles about Sintel Forms

Filter by categories Clear Results
  • About Sintel Forms

    • SharePoint List types supported by Sintel Forms
    • What is Sintel Forms
    • Why we built it
    • Sintel Apps and the security of your data
  • Getting Started

    • How to Install Sintel Forms
    • Adding Sintel Forms to a SharePoint Site
    • Authorizing Sintel Forms
    • Install Sintel Forms for SharePoint On-Prem
    • Sintel Forms Best Practices
  • Product Updates

    • Release History
    • Updating Sintel Forms for SharePoint On-Prem
    • Differences between the Cloud and On-Prem Versions of Sintel Forms
  • Settings

    • External Access Settings

      • Understanding External Access Settings in Sintel Forms
      • External Submissions
      • External Collaboration
      • External Sharing
      • External Access Settings
    • After save script
    • Basic Features
    • Conversations
    • Form Viewer
    • Hide Sintel Branding
    • Payments
    • Theme & Styling 
    • Confirmation screens
    • Localisation
    • How to avoid SharePoints list view threshold
  • Layout

    • About Layout
    • Adding and Editing Linked List items using Inline, Dialog & Sintel Forms Embedded
    • Adding Fields
    • Creating Calculated Fields & Using Formulas
    • Default values & custom values
    • Field and Section Validation
    • Linked Libraries-Using a Document/Picture Library
    • Linked Lists-How to add attachments
    • Sections - Tab order
    • Setting field properties within a Linked List
    • Using a Linked List
    • Form Header and Footer
    • New "Cosy" Form Interface
  • Workflow

    • About Workflow
    • Workflow: Statuses
    • Workflow: Actions
    • Workflow: Email
    • Workflow: Payment Actions
    • Deprecation of the SintelFormsWorkflow list
  • Logic

    • About Logic
    • Logic: Steps
    • Logic: Conditions
    • Logic: Rules
  • Reminders

    • Reminders
  • Basic Customisation

    • Applying a theme and adding icons or graphics
    • Changing button colours or hiding them
    • Embedded Action Buttons (deprecated)
    • Customising Send-From Address for Sintel Apps Emails
  • Advanced Customisation

    • The JavaScript API

      • Articles coming soon
    • Accessing external APIs
    • Creating custom buttons using JavaScript
    • Custom form styling using CSS
    • Programmatically creating Sintel Forms
    • The JavaScript API
    • Using query string parameters for default/calculated values
    • Restrict access to users not found in a SharePoint group
    • Advanced Customisation and Code Samples
    • Advanced Customisations: Quick Navigation Guide
  • FAQs

    • FAQs
    • Activating Sintel Forms on newly created tenants
    • Lists and columns used by Sintel Forms
    • Support and Training
    • Track the usage of Sintel Forms
    • Differences between the Cloud and On-Prem Versions of Sintel Forms
    • Permissions used by Sintel Forms
    • Permissions required to use the Sintel Forms Designer
    • SharePoint Add-Ins are retiring what can you do
  • How To Guides

    • Automatically add linked items or files
    • Change the layout of Choice Fields
    • Configure a cascading drop-down
    • Configure Printing Options
    • Debugging your forms
    • Embedded Action Buttons (deprecated)
    • Export a form template
    • How to complete a form action with Power Automate
    • Import a form template
    • Lookup Columns: Control the sort order
    • Lookup Columns: Retrieve additional columns from Lookup List
    • Make Attachments Mandatory
    • Set & clear field values using rules
    • Share a Form
    • Track the usage of Sintel Forms
    • Transferring your license to another tenant
    • Use Sintel Embedded Mode on a linked list
    • Use a Rule to check if third party cookies are enabled
    • Customising Send-From Address for Sintel Apps Emails
    • Recommended Permissions For Forms and Apps
    • Disable Sintel Forms on a list
    • Show all articles ( 6 ) Collapse Articles
  • Widgets

    • Buttons
    • Workflow History
    • HTML Widget
  • Noteworthy Features

    • Attachments and Image Previews
    • Image Annotations
    • Ink Signatures
    • Sintel Forms Mobile App
    • Workflow History
  • Troubleshooting

    • The redirect URL specified in the request does not match
    • Everything is fine but we had a small problem getting your license
    • "401 Unauthorized" error during form data save
    • "500 internal server error" on form opening
    • Activating Sintel Forms on newly created tenants
    • Ad blockers and Privacy Extensions
    • Attachments option missing in Sintel Forms
    • Changing the Content Approval settings of a list can cause an issue with Sintel Forms
    • Enabling third-party cookies
    • Handling the list view threshold for the Workflow and Conversations features
    • No actions appearing in the actions menu
    • Sintel Forms doesn't appear to be applied to a list
    • Sintel Forms Designer not available in the list command bar
    • Sintel Forms Save Process
    • Site naming and Sintel Forms
    • The remote server returned an error: (401) Unauthorized when importing a form template
    • Workflow emails containing incorrect links to forms
    • Workflow emails not being received by distribution lists or mail-enabled security groups
    • Workflow emails not being received by SharePoint group members
    • Data load error: Connection to SharePoint has been lost. Please reload the page.
    • Data save error: Access denied. You do not have permission to perform this action or access this resource
    • Email address of a Shared Mailbox not recognised by Sintel Forms
    • Add an exception for Sintel Forms instead of enabling third-party cookies
    • Export to PDF not working on SharePoint Subscription Edition
    • "404 FILE NOT FOUND" when attempting to open a new form or existing form
    • Show all articles ( 10 ) Collapse Articles
  • Code Samples

    • Embedded Action Buttons (deprecated)
    • Set email address from person field
    • Validate email addresses
    • Advanced Customisation and Code Samples
    • Advanced Customisations: Quick Navigation Guide
  • Sintel General Info

    • What we do
    • Who we are

Embedded Action Buttons (deprecated)

Posted21 June 2021
Updated16 July 2025
ByMichał Gołka
You are here:
  • Main
  • Basic Customisation
  • Embedded Action Buttons (deprecated)
0 out of 5 stars
5 Stars 0%
4 Stars 0%
3 Stars 0%
2 Stars 0%
1 Stars 0%
< All Topics
This article and its approach is now redundant due to an update in Sintel Forms that made this functionality easier!

Open our helpdesk article: https://sintelapps.com/product-help-sintel-forms/buttons

Sintel Forms now gives you the ability to embed action buttons onto your form. Previously, all action buttons were kept on the top of the form on the toolbar. That meant once you finished filling out your form, you would click the “Actions” option on the top of the form to either submit, approve, reject etc…

Clients had enquired about embedding these buttons directly onto the form so we’ve added it 🙂

Embedding buttons is a simple 3-step process

Step 1 Add the buttons to the form

Step 2 Define what they do

Step 3 Style them
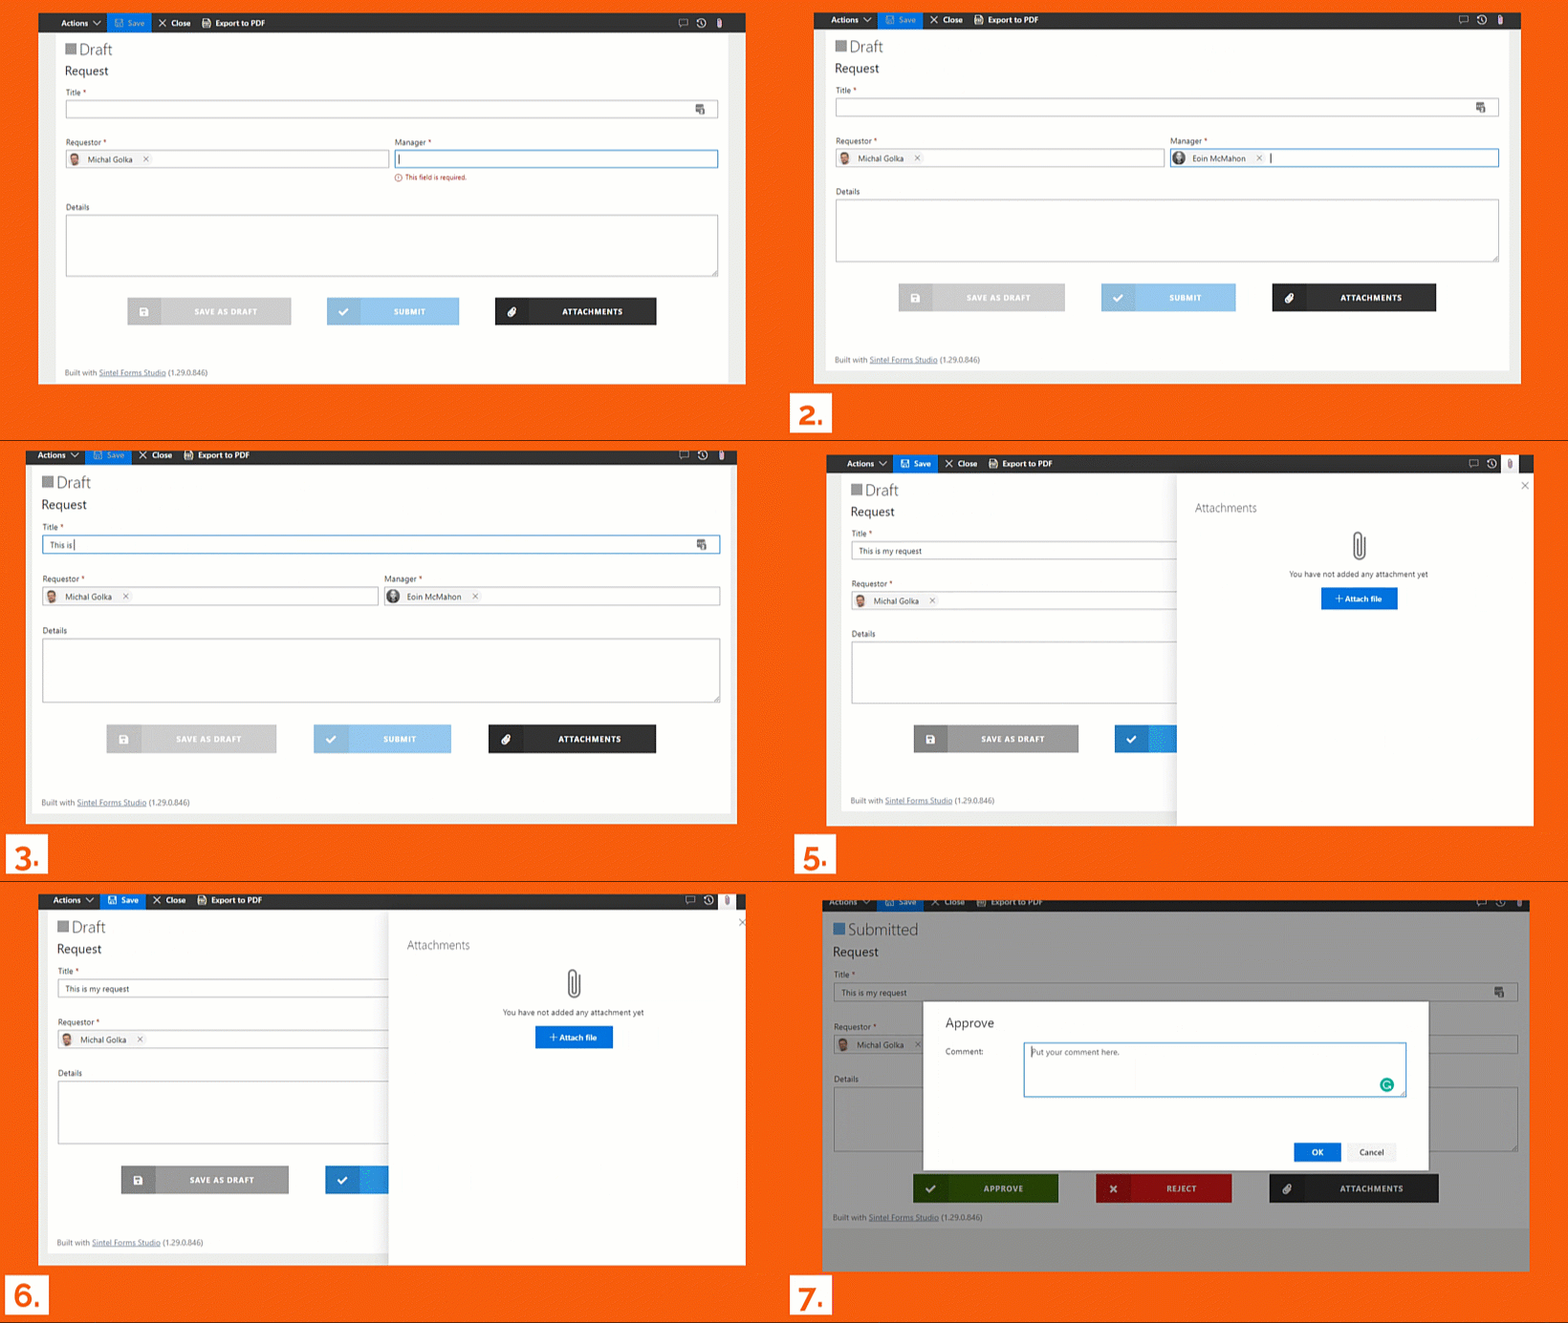
Examples of various buttons


Add the buttons

To add buttons to a form you need to add HTML into a section on the form. In my demo, I created two sections: one for displaying buttons when the form was in the Draft status and one for displaying buttons when the form was in the Submitted status.
The section that will be shown for the Draft status contains buttons:

  • Save as Draft: This is equivalent to the Save form option.
  • Submit: This executes the Submit action.
  • Attachments: This opens the attachments panel.
<div class="EmbeddedButtonsContainer">
  <button class="EmbeddedButton CheckValidation SaveAsDraft" onclick="window.SFCustomLogic.saveForm();">Save as Draft</button>
  <button class="EmbeddedButton CheckValidation Submit" onclick="window.SFCustomLogic.submitForm();">Submit</button>
  <button class="EmbeddedButton Attachments" onclick="window.SFCustomLogic.attachFiles();">Attachments</button>
</div>

The section that will be shown for the Submitted status contains the following buttons:

  • Approve: This executes the Approve action.
  • Reject: This executes the Reject action.
  • Attachments: This opens the attachments panel.
<div class="EmbeddedButtonsContainer">
  <button class="EmbeddedButton CheckValidation Approve" onclick="window.SFCustomLogic.approveForm();">Approve</button>
  <button class="EmbeddedButton CheckValidation Reject" onclick="window.SFCustomLogic.rejectForm();">Reject</button>
  <button class="EmbeddedButton Attachments" onclick="window.SFCustomLogic.attachFiles();">Attachments</button>
</div>


Define what they do

Next, within the Logic screen, you’ll need to create a new Rule so that clicking on these new buttons actually does something.  Create a new rule without any conditions and enable the “Run Once” flag. Add the “Execute custom js” step and paste your JavaScript into the step. Because the custom JavaScript is being evaluated during logic execution we need to define our onClick functions inside the window object.

var customLogic = function() {
  var self = this;    

  self.saveForm = function () {
    saveForm(); //Sintel Forms JavaScript API to save form
  };
  
  self.submitForm = function () {
    executeAction("cc92bfe0-cf43-11eb-9885-e7e8cf1237e4"); 
  };
  
  self.approveForm = function () {
    executeAction("670e21f0-cf43-11eb-9885-e7e8cf1237e4"); 
  };

  self.rejectForm = function () {
    executeAction("751549e0-cf43-11eb-9885-e7e8cf1237e4"); 
  };
  
  self.attachFiles = function () {   
    openPanel("attachments") 
  };
};

window.SFCustomLogic = new customLogic();

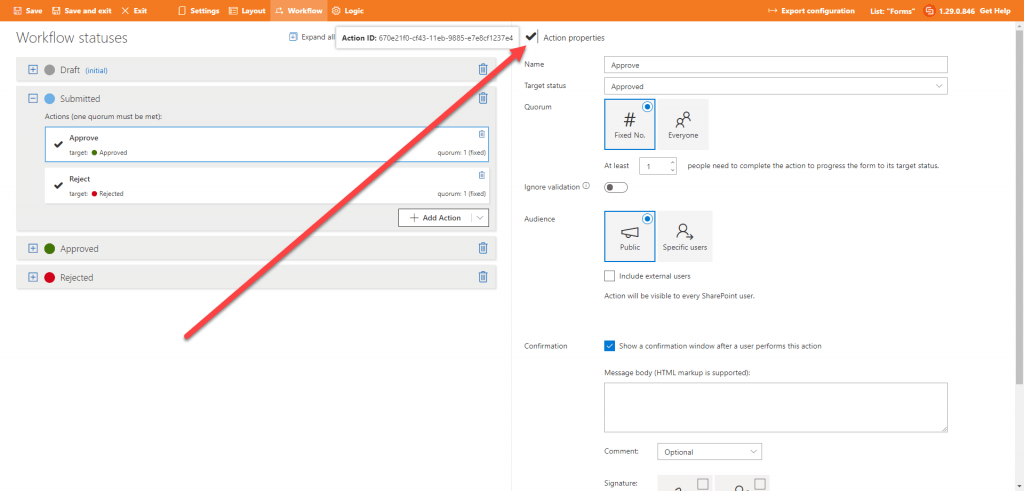
Follow our Knowledge Article / The JavaScript API to get function details. The executeAction function that I used in the code sample above requires the Workflow Action ID as a parameter. The Workflow Action ID can be obtained by opening the Workflow screen in the Sintel Forms Designer and clicking the action icon as shown. Obrtaining Action ID
Style them

Now that you have added the buttons in Step 1 and configured what they should do in Step 2 the next step is to apply some styling. This is done by opening the Settings screen within the Sintel Forms Designer and opening the Theme & Styling tab. Here is the CSS I used in the demo:

.EmbeddedButtonsContainer {
  text-align: center;
}

.EmbeddedButton {
  border: none;
  background: none;
  cursor: pointer;
  display: inline-block;
  margin: 15px 30px;
  text-transform: uppercase;
  letter-spacing: 1px;
  font-weight: 700;
  outline: none;
  position: relative;
  -webkit-transition: all 0.3s;
  -moz-transition: all 0.3s;
  transition: all 0.3s; 
  padding: 16px 60px 16px 120px;
}

.EmbeddedButton:after {
  content: '';
  position: absolute;
  z-index: -1;
  -webkit-transition: all 0.3s;
  -moz-transition: all 0.3s;
  transition: all 0.3s;
}

.EmbeddedButton:before {
  font-family: 'Font Awesome 5 Pro';  
  line-height: 1;
  position: relative;
  -webkit-font-smoothing: antialiased;
  background: rgba(0,0,0,0.15);
  line-height: 3;
  font-size: 130%;  
  height: 100%;
  position: absolute; 
  left: 0;
  top: 0;
  width: 60px;  
}

.form-with-validation-errors .EmbeddedButton.CheckValidation {
  filter: opacity(50%);
}

.EmbeddedButton:active {
  top: 2px;
  filter: brightness(75%);
}

.EmbeddedButton:hover {
  filter: brightness(125%);
}

/* .EmbeddedButton.SaveAsDraft */
.EmbeddedButton.SaveAsDraft {
  background: #9b9b9b;
  color: #fff;
}

.EmbeddedButton.SaveAsDraft:before {
  content: "\f0c7"; /* Font Awsome Icon */
}

/* .EmbeddedButton.Submit */
.EmbeddedButton.Submit {
  background: #3498db;
  color: #fff;
}

.EmbeddedButton.Submit:before {
  content: "\f00c"; /* Font Awsome Icon Unicode value */
}

/* .EmbeddedButton.Approve */
.EmbeddedButton.Approve {
  background: #417505;
  color: #fff;
}

.EmbeddedButton.Approve:before {  
  content: "\f00c"; /* Font Awsome Icon Unicode value */
}

/* .EmbeddedButton.Reject */
.EmbeddedButton.Reject {
  background: #d0021b;
  color: #fff;
}

.EmbeddedButton.Reject:before {  
  content: "\f00d"; /* Font Awsome Icon Unicode value */
}

/* .EmbeddedButton.Attachments */
.EmbeddedButton.Attachments {
  background: #333333;
  color: #fff;
}

.EmbeddedButton.Attachments:before {  
  content: "\f0c6"; /* Font Awsome Icon Unicode value */
}

Note 1:

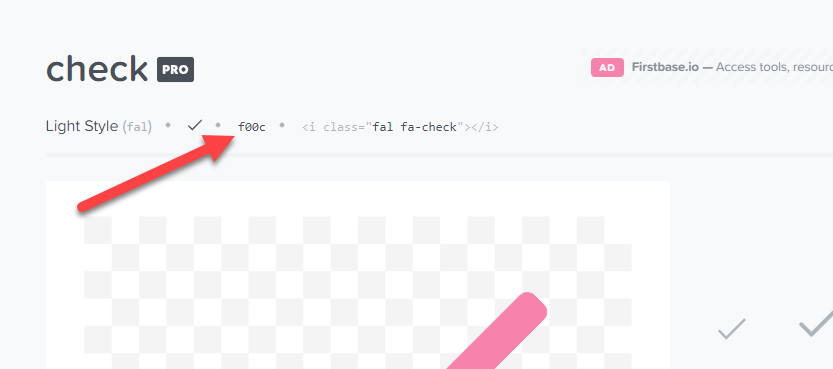
Sintel Form uses the Font Awesome professional. To find Unicode value for your icon simply open https://fontawesome.com, locate your icon and copy its Unicode value as presented on the image below.
Note 2:

If a form contains a validation error, the class form-with-validation-errors gets added to the form viewer. This allows visually disabling our embedded buttons using the CSS:

.form-with-validation-errors .EmbeddedButton.CheckValidation { filter: opacity(50%); }


Thanks for reading this article on how to embed action buttons onto your form. For all the latest updates on Sintel follow us on LinkedIn/Twitter/YouTube.  This form template is available for you to download here.
If you are interested in trying this form or designing your own form the first step is to install Sintel Forms Studio into your Microsoft 365 tenant, get it from AppSource.


AppSource

Was this article helpful?
0 out of 5 stars
5 Stars 0%
4 Stars 0%
3 Stars 0%
2 Stars 0%
1 Stars 0%
5
How can we improve this article?
Please submit the reason for your vote so that we can improve the article.
Table of Contents

Sintel Apps

Create apps on Microsoft 365 in minutes with no code.

Address

River House
Blackpool Park,
Cork, T23 R5TF,
Ireland

Support

  • Product help
  • Community site
  • Submit a ticket
  • Compare us

    Contact us to

    • Book a demo
    • Request a license
    • Become a partner

    e-mail: info@sintelapps.com
    tel: +353 (0) 21 245 2935

    Follow us

    • Follow
    • Follow
    • Follow

    © Copyright 2026 | End User License Agreement | Privacy Policy | Terms Of Use

    Sintel Apps
    Sintel Apps Assistant
    Get instant answers and support
    Connecting to Sintel Apps Assistant…
    Sintel is thinking…
    We use cookies to collect and analyse information about the users of this website. Please click 'I accept' to consent to the use of this technology.