Search for answers or browse articles about Sintel Forms
Logic: Steps
Steps define what happens when a rule is triggered by a condition. Once a rule is fired, a step executes a specific action, such as:
✔ Making a form read-only
✔ Hiding or showing fields, sections, or tabs
✔ Preventing users from saving or editing items
✔ Running custom JavaScript for advanced behaviour
By combining conditions, rules, and steps, you can create dynamic, automated forms that respond to user inputs and workflow progress.
? 1. Form-Based Steps
(Actions that affect the entire form)
– Disable Features (Read-Only Mode, Workflow Tasks, PDF Export, Save Button)
This step allows you to:
- Make the entire form read-only.
- Hide workflow tasks to prevent unnecessary actions.
- Disable PDF export.
- Disable the Save button.
To set this step you need to define:
Section – The particular section whose state you want to set.
State – The state you want to set the section to (you can choose from one of 3 possible states- optional, mandatory, read-only).
? Example: Make a form read-only after submission.
Example
– Prevent Editing Related List Items
Stops users from modifying Linked Lists, Document Libraries, and Picture Libraries.
? Example: Users cannot edit existing related items, but they can add new ones.
Example

? 2. Section-Based Steps
(Actions that affect form sections)
– Change Section State
Sets a section to Optional, Mandatory, or Read-Only.
? Example: A rule makes the “Manager Approval” section mandatory once the status is “Pending Approval”.
Example


– Change Section Title
Modifies the section title dynamically based on user input or form status.
To set this step you need to define:
Section – The particular section whose title you want to change.
Title – The title you want to set on the section.
? Example: Change a section title to “Customer Details” if a customer is selected.
Example

– Change Section Visibility
Shows or hides a section based on conditions.
To set this step you need to define:
Section – The particular section whose visibility you want to change.
Visibility – The visibility state you want to apply to the chosen section.
? Example: Hide the “Internal Notes” section for external users.
Example


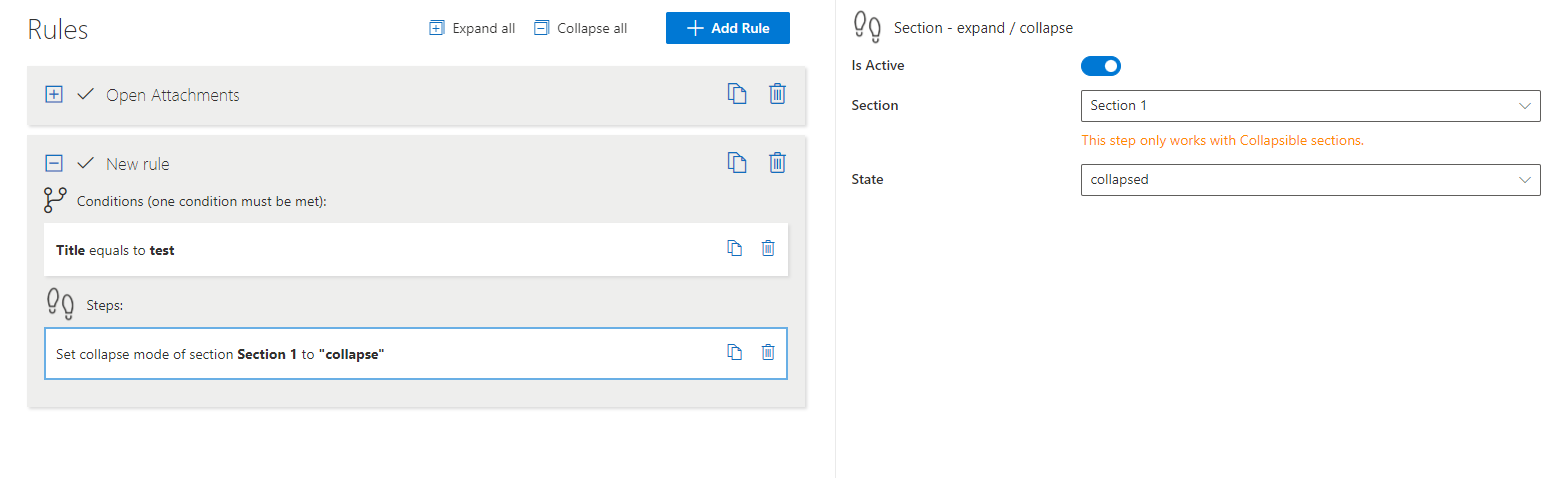
– Expand/Collapse Section
Expands or collapses a section if a Collapsible property is enabled.
To set this step you need to define:
Section – The particular section which you want to expand/collapse. You can select only sections that have Collapsible property enabled.
? Example: Automatically collapse the “Additional Details” section unless required.
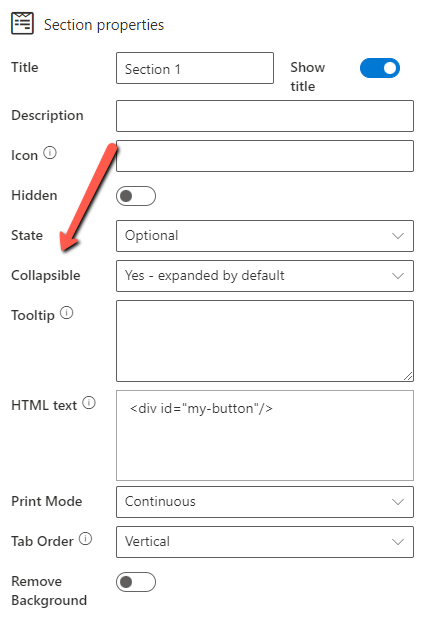
State – Describes which state the section should go to – expand or collapse.
Example
– Set Custom HTML Content in a Section
Inject HTML content into a section dynamically.
To set this step you need to define:
Section – The particular section in which you want to insert HTML content.
HTML content – The actual content to be inserted.
? Example: Display instructions in a form section based on the selected user role.
Example
? 3. Field-Based Steps
(Actions that affect individual form fields)
– Change Field State
Sets a field to Inherit from Section, Optional, Mandatory, or Read-Only.
To set this step you need to define:
Field – The specific field whose state you wish to set.
State – The state you wish to set the field to (one of four possible states- inherit from section, optional, mandatory, read-only).
? Example: Make the “Justification” field mandatory when a purchase amount exceeds £1,000.
Example
– Change Field Label
Dynamically updates a field’s label.
To set this step you need to define:
Field – The field whose title you wish to change.
Title – The title you wish to set on the field.
? Example: If “Project Type” is “Internal”, rename the “Client Name” field to “Department Name”.
Example
– Change Field Visibility
Hides or shows a field based on conditions.
To set this step you need to define:
Field – The field whose visibility you wish to change.
Visibility – The visibility state you want to apply to the chosen field.
? Example: Hide the “Discount Code” field unless a VIP customer is selected.
Example

– Change Field Typography (Size, Colour, Background)
Modifies a field’s font size, colour, and background.
To set this step you need to define:
Field – The field whose typography you wish to change.
Font Size – The font size that you want to apply to the chosen field and/or
Font Color – The font colour you want to apply to the chosen field and/or
Background Color – The background colour you want to apply to the chosen field.
? Example: Highlight the “Due Date” field in red if overdue.
Example

Set a Custom Error Message
Prevents form submission with a custom validation error.
To set this step you need to define:
Field – The field which error you want to set up i.e. what are the conditions for the error?
Error message – The error message you want to apply to the chosen field.
? Example: Display “Invalid email format” if an email address is missing “@”.
Example
? 4. Tab-Based Steps
(Actions that affect form tabs)
– Change Tab Visibility
Shows or hides an entire tab based on conditions.
To set this step you need to define:
Tab – The tab whose visibility you wish to change.
Visibility – The visibility state you want to apply to the chosen tab.
? Example: Hide the “Billing” tab unless the “Paid Invoice” checkbox is selected.
Example

? 5. Workflow-Based Steps
(Actions that affect workflows and tasks)
– Hide or Disable a Workflow Action
Prevents users from selecting specific workflow actions.
To set this step you need to define:
Workflow Action – The action you wish to hide or disable.
Effect – Whether to hide or disable the action.
? Example: Disable the “Approve” button until all required fields are completed.
Example

Managing Steps
✅ Enable/Disable Steps: Temporarily turn steps on/off.
❌ Delete Steps: Remove unnecessary steps.
↔️ Reorder Steps: Drag and drop steps to adjust execution priority.

Advanced Custom Steps (JavaScript)
For complex logic, use “Execute custom JS function” to define custom actions using JavaScript.
? Learn more: Advanced JavaScript Steps
? Next Steps
Now that you understand Steps, explore:
? Logic Conditions – How conditions trigger rules.
? Logic Rules – How rules execute steps when conditions are met.
By combining conditions, rules, and steps, you can create smart, dynamic forms that improve user experience and data accuracy.