Search for answers or browse articles about Sintel Forms
Configure a cascading drop-down
Sintel Forms allows for quick setup of lookup fields on a form – including the possibility to make one lookup field dependent on another.
Configuring Cascading Dropdowns
You can easily set up a cascading drop-down within Sintel Forms by combining lookup lists and creating a Rule in the Logic screen of the Sintel Forms Designer.
Sintel Forms supports cascading drop-downs on the following:
- The main form
- Any linked list on the main form
- Between the main form and any linked list
Cascading Dropdowns are very powerful and uses the following notation:
cascadingDropdowns(parentLookupFieldName , childLookupFieldName, childLookupFilterFieldName);
Cascading Dropdown Example
In the following example, we will set up a basic cascade between two columns on a form namely “Countries” and “Cities”.
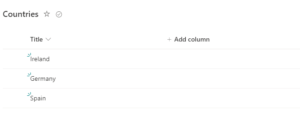
- Create the “Countries” list and add some countries to it.
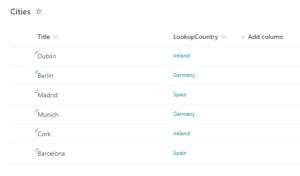
- Create the “Cities” list, add a lookup column “LookupCountry” that is connected to the “Countries” list from step 1 and then add some cities.
- Create the main list (the one in which you will enable Sintel Forms) and add 2 lookup fields “City” and “Country” that are linked to the “Countries” and “Cities” lists created in steps 1-2.
- From your main list launch the Sintel Forms Designer and click on the Logic Section from the top menu.
- Click on Add Rule and give it a name.
- There is no need to add a condition as you want this rule to execute always.
- Add a step choosing “Execute custom js function” and paste in the following JavaScript:
- Now, as the user selects a country in the “Country” dropdown field, the “City” dropdown will automatically filter to display the appropriate cities.
cascadingDropdowns("Country" , "City", "LookupCountry");


In the example above:
- The first field name (Country) is the internal column name of the parent column in the main form.
- The second (City) is the internal column name of the child column in the main form.
- The third (LookupCountry) is the internal column name used within the child list (Cities) to lookup the parent item in the Parent list (Countries).
Cascading within a linked list
Use the same approach however you need to prefix the columns with the display name of the linked list or its internal GUID such as
cascadingDropdowns("LinkedListDisplayName.Continent","LinkedListDisplayName.Country", "Continent");or
cascadingDropdowns("c13d069f-869a-4186-94b2-c234898d9d62.Continent","c13d069f-869a-4186-94b2-c234898d9d62.Country", "Continent");
Cascading the main form & a linked list
You only need to prefix columns from the linked list
cascadingDropdowns("Continent","LinkedListDisplayName.Country", "Continent");
cascadingDropdowns(“Continent”, “Country”, “Continent”);
cascadingDropdowns(“Country”, “City”, “Country”);
Multi-level Cascading
If you want a multi-level cascade, you can use the multiParentCascadingDropdowns.
In the following example, a single list stores car models including their manufacturer and fuel type. You are then able to add 3 dropdowns onto the form (“Manufacturer”, “Fuel Type”, and finally “Car Model”. Using the following script you can set up a 2 level cascade such that a user can choose a “Manufacturer” and “Fuel Type” and then when they click on the “Car Model” only items that match the selected “Manufacturer” and “Fuel Type” will be available for selection.
multiParentCascadingDropdowns("CarModel", [{parentLookupFieldName: "Manufacturers", lookupColumnName: "Manufacturer"}, {parentLookupFieldName: "TypesOfFuel", lookupColumnName: "TypeOfFuel"}]);This example assumes all your data is in a single list.
