Search for answers or browse articles about Sintel Forms
Advanced Customisation and Code Samples
1. Redirecting the User on Form Load
This rule automatically redirects the user to a new URL when the form loads. It’s useful for guiding users to a specific page, such as a new form version or an external resource.
Why use it?
Maybe you updated your form and want users to go to the new version.
Maybe you want them to visit an external resource instead of filling out the current form.
How to Add this Rule
- In your form: Go to the Logic tab and click + Add a Rule.
- Set the Condition: Choose None (this will run the rule every time the form loads).
- Add the Step: In the Steps section, drag the step: Execute JS to the rule. Paste in the code below:
location.replace('https://google.com');
- Click Save
This will redirect to the new URL without creating a new entry in the browser history.
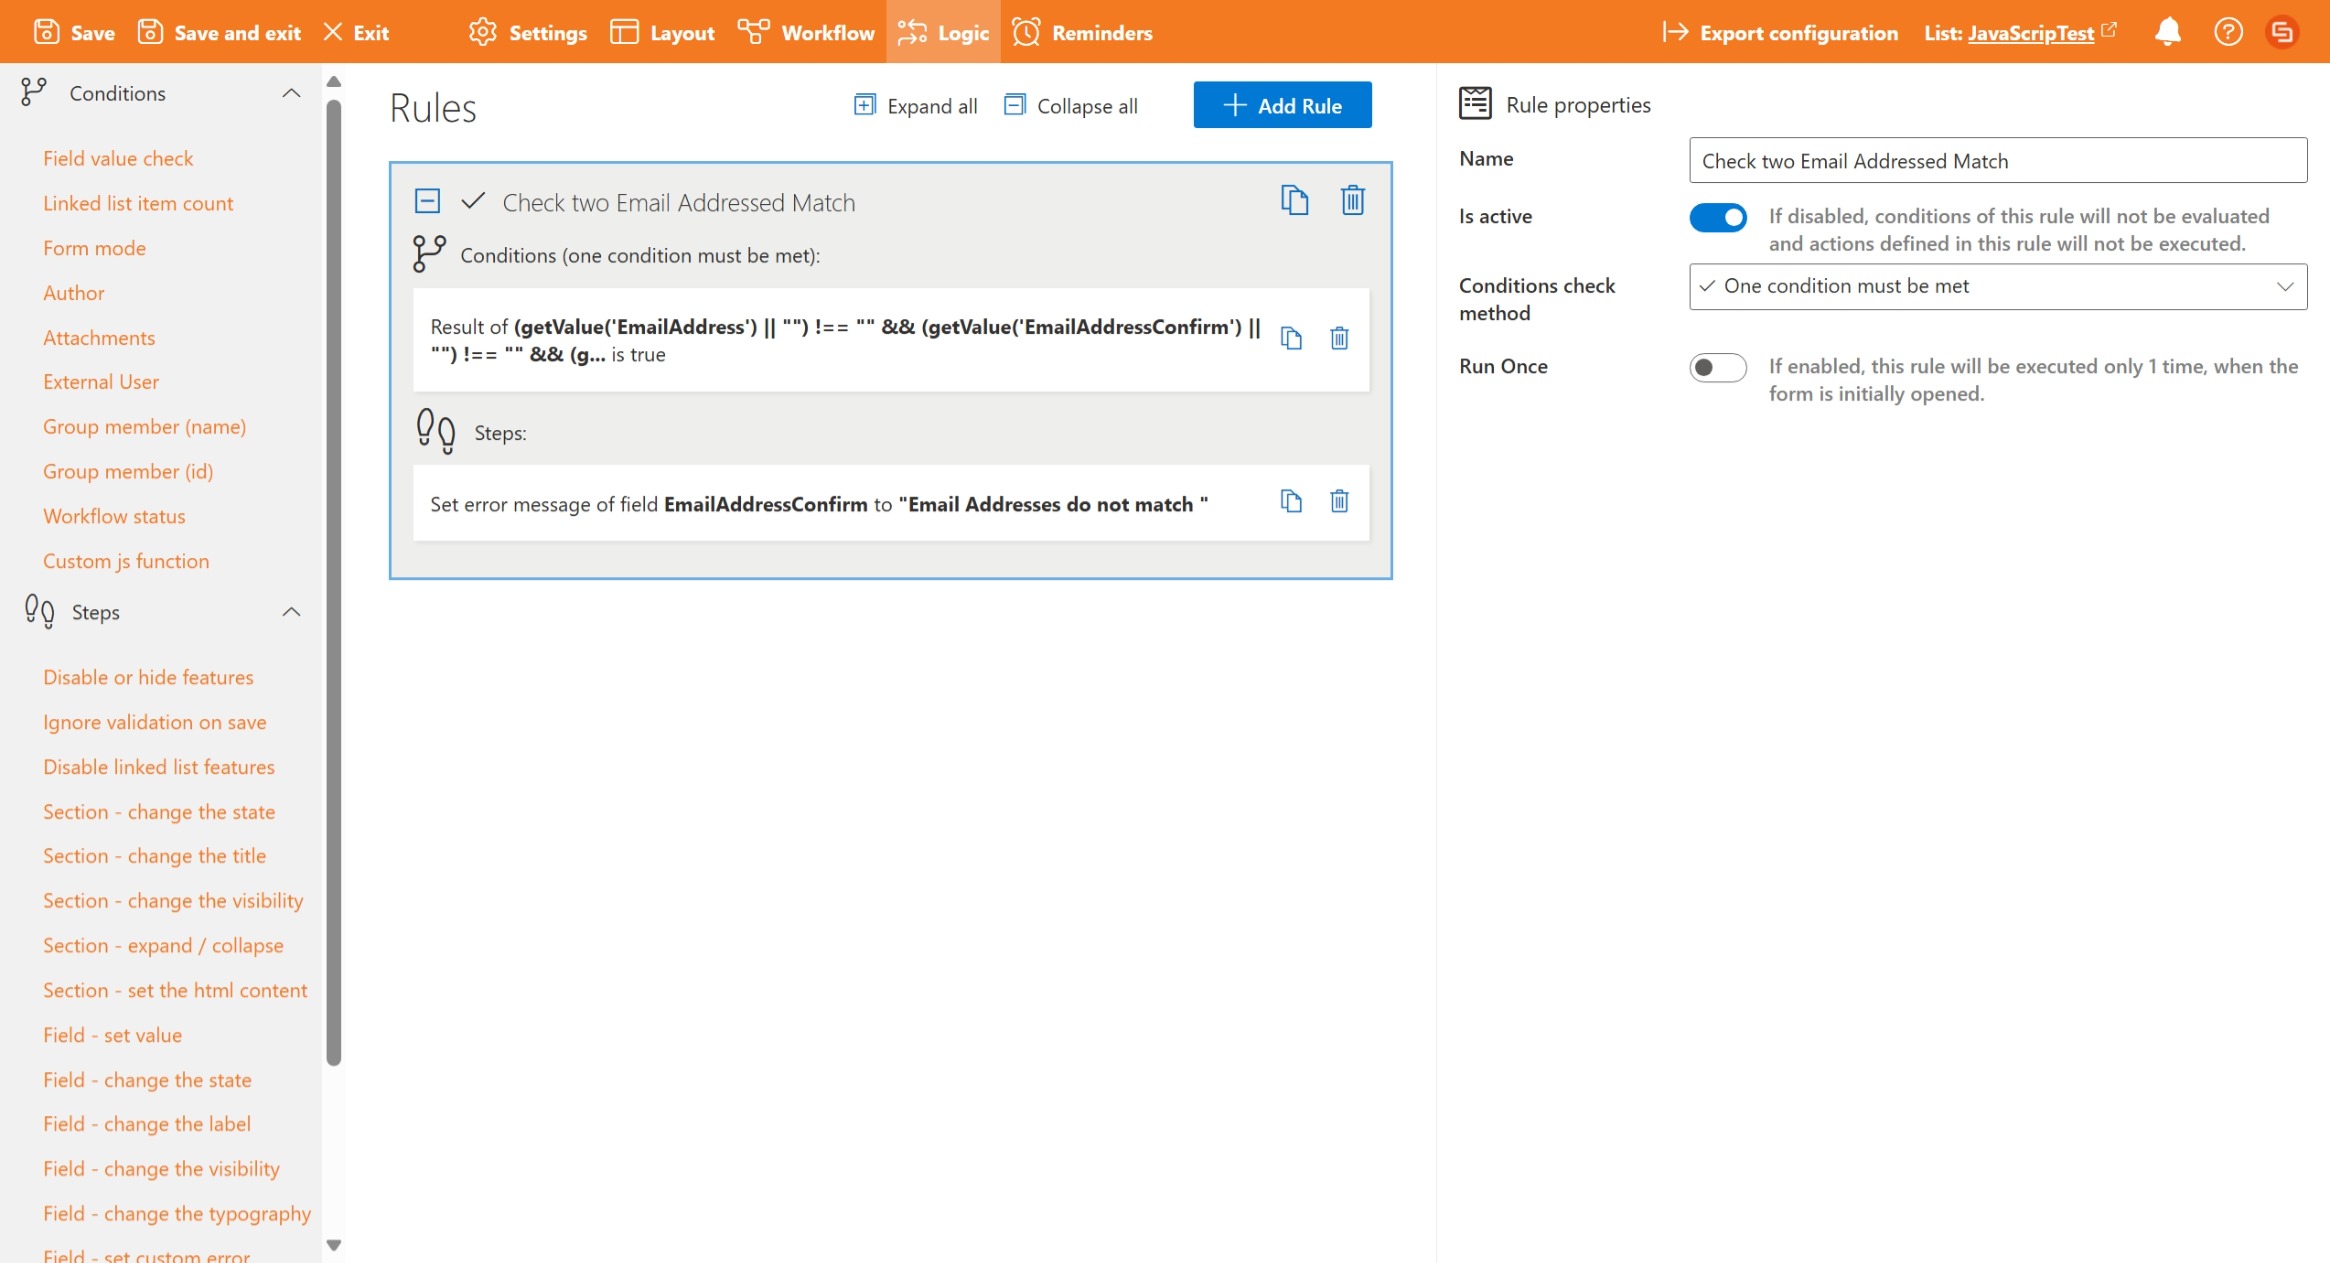
2. Email Confirmation Check
This rule ensures that two email fields match before the form can be submitted. It’s useful for improving data accuracy and avoiding sending emails to mistyped addresses by making sure the confirmation email matches the original.
How to Add this Rule
- Open the Logic Pane: In your form, go to the Logic tab and Click + Add a Rule.
- Set the Condition: Choose Custom JS function as the condition type and Paste in the code below. Remember to replace EmailAddress and EmailAddressConfirm with the exact field names from your form’s properties.
(getValue('EmailAddress') || "") !== "" && (getValue('EmailAddressConfirm') || "") !== "" && (getValue('EmailAddress') || "").toLowerCase() !== (getValue('EmailAddressConfirm') || "").toLowerCase()- Add the Error Message Step: In the Steps section of the rule, drag the step: Field – Set Custom Error to the step section of your rule. Select – Field: EmailAddressConfirm Error message: “Email addresses do not match”
- Save
3. Hyperlink Field
This rule sets the value of a hyperlink field dynamically. It’s useful for providing users with direct links to related documents or resources.
How to Add this Rule
- In your form: Go to the Logic tab and click + Add a Rule.
- Set the Condition: Don’t choose any or else choose or any condition you want the link to appear under).
- Add the Step: In the Steps section, drag the step: Execute JS and paste in the code below:
setValue("JobCardURL", {description: "view here", url: "https://www.google.com"})Save → Now, when the form loads (or when the condition is met), the hyperlink field is automatically filled with a clickable link.
4. User/People Field Check
This rule checks if two user fields, such as Requester and Manager, contain the same person. It’s useful to ensure approvals or submissions are not self-assigned, maintaining proper workflow rules.
Why use it?
Prevent users from approving their own requests and ensures workflows follow proper hierarchy.
How to Add this Rule
- In your form: Go to the Logic tab and click + Add a Rule.
- Set the Condition: Choose Custom JS function and paste the code below.
- Add the Error Message Step: Drag Field – Set Custom Error to the Steps section.
Field: Manager Error message: “The manager can’t be the same as the requester“- Save
getValue('Requester')[0].id == getValue('Manager')[0].id
5. Date Field Validation – End Date After Start Date
This rule ensures that the end date is later than the start date. It’s useful for scheduling forms, bookings, or tasks that require a valid date range.
Why use it?
Prevent users from entering an end date before the start date and Improve data accuracy for scheduling purposes.
How to Add this Rule
- In your form: Go to the Logic tab and click + Add a Rule.
- Set the Condition: Choose Custom JS function and paste the code below
- Make sure the field names inside getValue() are wrapped in quotes. For example, use getValue(“StartDate”) and not getValue(StartDate).
- Click Save
const dateFrom = getValue("StartDate"); const dateTo = getValue("EndDate"); if (dateFrom && dateTo) { const isFromSmallerThanTo = moment(dateFrom) <= moment(dateTo); if (!isFromSmallerThanTo) { setErrorMessage("EndDate", "End date must be larger than the start date."); } }
6. Date Field Validation – No Past Dates
This rule prevents users from selecting a date in the past. It’s useful for bookings, deadlines, or authorisation forms.
Why use it?
Avoid errors caused by submitting outdated dates and Ensure all submissions are relevant and timely.
How to Add this Rule
- In your form: Go to the Logic tab and click + Add a Rule.
- Set the Condition: Choose Custom JS function and paste the code below.
- Click Save
getValue("AuthorisedDate").setHours(0,0,0,0) < (new Date()).setHours(0,0,0,0) var today = moment().startOf('day'); moment(getValue("AuthorisedDate")).isBefore(today);
7. Character Count Validation
This rule checks the number of characters in a text field and prevents exceeding the limit.
Why use it?
Maintain consistent data formatting and avoid overly long inputs that could break forms or reports.
How to Add this Rule
- In your form: Go to the Logic tab and click + Add a Rule.
- Set the Condition: Choose None or a condition to activate the check.
- Add the Step: Drag Execute JS and paste the code below.
- Click Save
let number = (getValue('FullPostalAddressOfOrganisation')||"").length; if (number) { if (number > 10) { setErrorMessage("FullPostalAddressOfOrganisation", "The max characters is 10"); } }
8. Limit Date to 14 Days from Today
This rule ensures a selected date is not more than 14 days from the current date.
Why use it?
Control scheduling or authorisation windows and Prevent users from entering far-future dates.How to Add this Rule
- In your form: Go to the Logic tab and click + Add a Rule.
- Set the Condition: None
- Add the Step: Drag Execute JS and paste:
- Click Save
let givenDate = moment(getValue("ChosenDate"), 'YYYY-MM-DD'); let today = moment(); if (givenDate && givenDate.isAfter(moment(today).add(14, 'days'))) { setErrorMessage("ChosenDate", "The date can't be more than 14 days from today."); }
9. Comparing Dates
This rule calculates the difference between two dates and can be used to automatically set the number of days between them. It’s useful for reporting, scheduling, or tracking durations.
Why use it?
Automatically calculate durations for tasks, bookings, or leave requests. Ensure accurate reporting without manual calculation.
How to Add this Rule
- In your form: Go to the Logic tab and click + Add a Rule.
- Set the Condition: Choose None or a custom condition if needed.
- Add the Step: Drag Execute JS and paste the code below
- Click Save
let days = moment(getValue('Date1')).diff(moment(getValue('Date2')), 'days') + 1; setField('days', days);
10. Validating Email Fields
This rule ensures an email field is correctly formatted and not empty. It’s useful for avoiding invalid email submissions that could break automated notifications or communications.
Why use it?
Ensure submitted emails are valid before sending notifications and Improve data accuracy.
How to Add this Rule
- In your form: Go to the Logic tab and click + Add a Rule.
- Set the Condition: Choose Custom JS function and paste:
const fieldValue = getValue("EMail") ?? ""; !fieldValue.match(/^\w+([\.-]?\w+)*@\w+([\.-]?\w+)*(\.[a-zA-Z]{2,})$/);
- Add the Step: Drag Field – Set Custom Error to the Steps section.
Field:EMail and Error message: “Please enter a valid email address”- Click Save
11. After-Save Scripts – Auto-Set Form Title
After-save scripts run once the form is saved and can automatically generate a title or reference number. This is useful for keeping forms organised or assigning unique identifiers.
This is done within the settings panel – After-Save Script
Why use it?
Automatically generate unique titles for new submissions and keep numbering consistent without manual input.
Example 1: 5-digit number padding
let id = “00000” + getValue(“ID”); setValue(“Title”, id.substr(id.length -5));
Example 2: 6-digit number with prefix
var counter = ‘000000’ + getValue(‘ID’); var acro = ‘CCM’; var newID = acro + counter.substr(counter.length-6,6); setValue(‘Title’, newID);
Example 3: 5-digit number with prefix and offset
var counter = ‘00000’.concat((getValue(‘ID’)*1) – 24); var acro = ‘MBF-‘; var newID = acro.concat(counter.substr(counter.length-5,5)); setValue(‘Title’, newID);
Example 4: Only set title if not already set
let oldTitle = getValue(“Title”); var idValue = getValue(‘ID’); var counter = idValue.toString().padStart(6, ‘0’); var acro = ‘FE-‘; var newID = acro + counter; if (oldTitle != newID){ setValue(‘Title’, newID); }
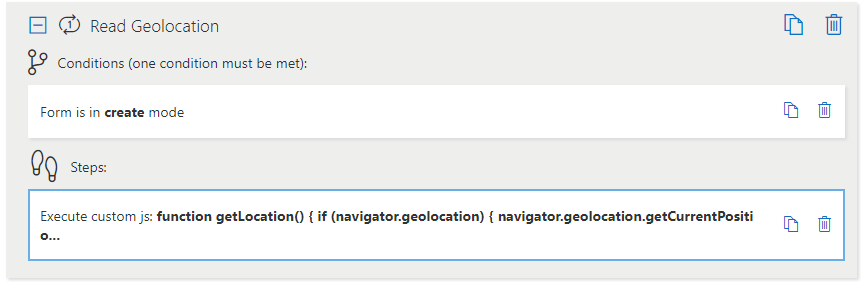
12. Geolocation (Get GPS Coordinates)
This rule captures the user’s current location if their browser supports it. It’s useful for forms that need to track where submissions are made.
Why use it?
Automatically record location for field visits, inspections, or audits and Saves time compared to manual entry.How to Add this Rule
- In your form: Go to the Logic tab and click + Add a Rule.
- Set the Condition: Choose None or any condition you want.
- Add the Step: Drag Execute JS and paste:
function getLocation() { if (navigator.geolocation) { navigator.geolocation.getCurrentPosition(setPosition); } else { setErrorMessage("Geolocation", "Geolocation is not supported by this browser."); } } function setPosition(position) { setValue("Geolocation", "Latitude: " + position.coords.latitude + ", Longitude: " + position.coords.longitude); } getLocation();
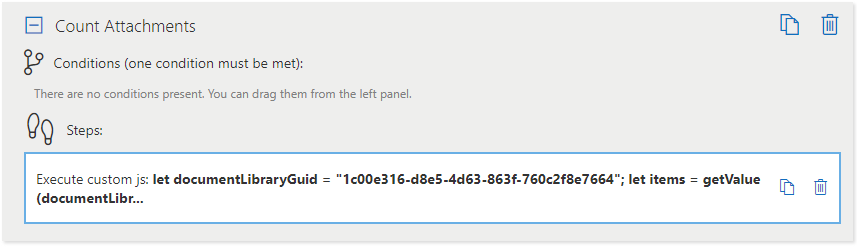
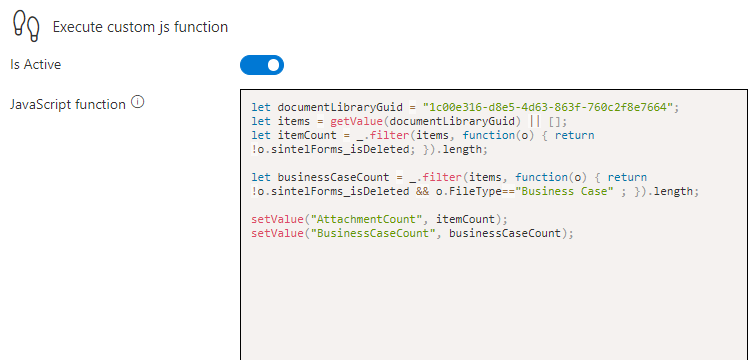
13. Count the Number of Linked List Items
This rule calculates the number of items in a linked list or document library and stores the count in a numeric field. It’s useful for tracking how many attachments or related items are associated with a form.
Why use it?
Automatically count attachments or related records without manual input. Useful for validation (e.g., requiring at least one attachment) or reporting.
How to Add this Rule
- In your form: Create a numeric field called AttachmentCount.
- Go to the Logic tab and click + Add a Rule.
- Set the Condition: Choose None or any condition you want.
- Add the Step: Drag Execute JS and paste:
let documentLibraryGuid = "1c00e316-d8e5-4d63-863f-760c2f8e7664"; let items = getValue(documentLibraryGuid) || []; let itemCount = _.filter(items, function(o) { return !o.sintelForms_isDeleted; }).length; setValue("AttachmentCount", itemCount);Now, whenever the form is updated or the rule runs, the AttachmentCount field automatically reflects the number of linked list items that are not deleted.
14. Validate 10-Digit Phone Number
This rule ensures that a mobile number entered in a form follows a specific 10-digit format. It’s useful for maintaining consistent data and preventing invalid numbers from being submitted.
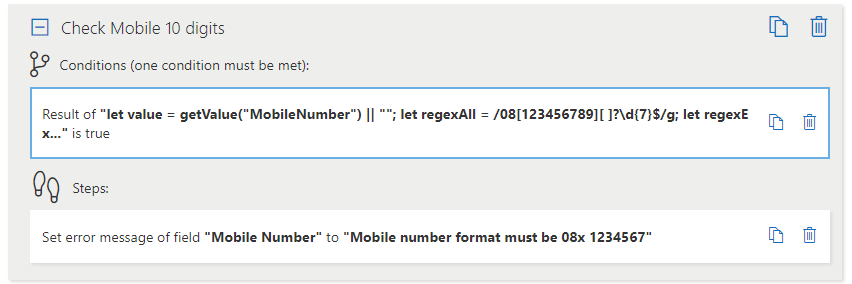

Why use it?
Prevents typos in phone numbers and ensures all phone numbers follow a standard format for validation or contact purposes.
How to Add this Rule
- In your form: Go to the Logic tab and click + Add a Rule.
- Set the Condition: Choose Custom JS function and paste the code below. Make sure to replace “MobileNumber” with the exact field name in your form:
let value = getValue("MobileNumber") || ""; let regexAll = /08[123456789][ ]?\d{7}$/g; let regexExact = /08[123456789] \d{7}$/g; function CheckPhoneAll(pNumb) { return regexAll.test(pNumb); } function CheckPhoneExact(pNumb) { return regexExact.test(pNumb); } function IsErrorOrValidateAndCorrect() { if (!CheckPhoneAll(value)) { return true; } else { if (!CheckPhoneExact(value)) { let newValue = _.slice(value, 0, 3).join("") + " " + _.slice(value, 3).join(""); setValue("MobileNumber", newValue); } } } IsErrorOrValidateAndCorrect(); - Add the Step: Drag Field – Set Custom Error and select the field MobileNumber with an appropriate error message like: “Please enter a valid 10-digit phone number”.
- Now, the form will validate that the mobile number is in the correct 10-digit format, and automatically add a space if necessary.
15. Set a User Field Based on SharePoint Group Membership
This rule checks whether the current user belongs to specific SharePoint groups and can disable the form if they do not. It’s useful for controlling access to forms or certain features based on user permissions.
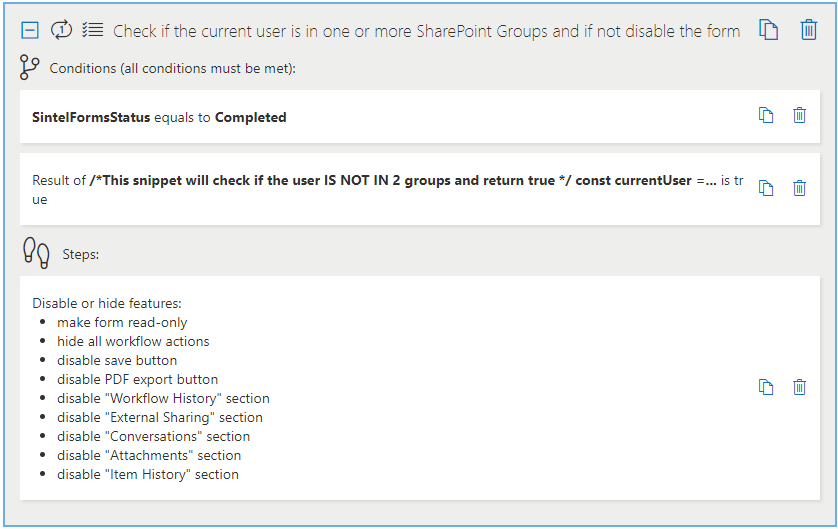
Why use it?
Ensures only authorised users can submit or interact with a form and Can hide or disable fields for users who are not part of required groups.How to Add this Rule
- In your form: Go to the Logic tab and click + Add a Rule.
- Set the Condition: Choose All conditions must be met, then:
- Field Value Check: Field: SintelFormsStatus Value: Completed
- Custom JS Function: Use one of the following snippets depending on your needs:
To check if the user is NOT in both groups:
const currentUser = getCurrentUser(); const currentUserGroup1 = _.findIndex(currentUser.groups, {'name': 'Enter Group 1 Name'}) == -1; const currentUserGroup2 = _.findIndex(currentUser.groups, {'name': 'Enter Group 2 Name'}) == -1; return currentUserGroup1 && currentUserGroup2;To check if the user IS in at least one of the groups:
const currentUser = getCurrentUser(); const currentUserGroup1 = _.findIndex(currentUser.groups, {'name': 'Enter Group 1 Name'}) > -1; const currentUserGroup2 = _.findIndex(currentUser.groups, {'name': 'Enter Group 2 Name'}) > -1; return currentUserGroup1 || currentUserGroup2;
Add the Step: Drag Disable or Hide Features and select all fields or form features to disable for users who do not meet the condition.
Enable Run Once if you only want the check to happen when the form is first loaded.
Click Save
Now, the form will automatically restrict access or functionality based on the user’s SharePoint group membership.
16. Disabling Actions for a Period of Time
This rule prevents users from performing certain actions within a specific date range. It’s useful for temporarily restricting form submissions, approvals, or other actions during maintenance periods or controlled windows.
Why use it?
Prevent users from submitting forms before or after a defined period. Restrict workflow actions temporarily, such as approvals or edits.How to Add this Rule
- In your form: Go to the Logic tab and click + Add a Rule.
- Set the Condition: Choose Custom JS function and paste the code below:
/*Check if the current date is between two dates*/ new Date() >= new Date('2023-04-09') && new Date() <= new Date('2023-04-15')
- Add the Step: Drag Workflow – Hide/Disable Action to the Steps section. Select the actions you want to disable.
- Settings: Conditions check method: One condition must be met and Run Once: Disabled (so it checks every time the form loads or is updated)
- Now, the specified actions will only be disabled during the defined date range. You can also adapt this approach to only allow submissions between certain dates or enforce other time-based restrictions.
17. Only Permitting Numbers in a Single Line Text Field
This rule ensures that a field only contains numeric values. It’s useful for preventing users from entering letters or special characters in fields that should only hold numbers, such as work numbers, IDs, or quantities.
Why use it?
Improve data accuracy by restricting non-numeric input and Avoid errors when numeric values are required for calculations or integrations.How to Add this Rule
- In your form: Go to the Logic tab and click + Add a Rule.
- Set the Condition: Choose Custom JS function and paste the code below (replace WorkNumber with the exact field name from your form):
const fieldName = "WorkNumber"; let fieldValue = getValue(fieldName) || ""; !(/^\d+$/.test(fieldValue)) && (fieldValue != "")- Add the Step: In the Steps section, drag Field – Set Custom Error to the rule. Select: Field: WorkNumber and Error Message: “Only numeric values are allowed.”
- Now, users will only be able to enter numbers in the designated field. Any non-numeric input will trigger an error message.
18. Injecting Data into an Email Without Showing Blank Entries
This approach allows you to include multiple field values in an email while ensuring that empty fields do not create blank spaces. It’s useful for generating clean, professional emails that dynamically display only the information the user provided.
Why use it? Keeps emails tidy by not showing empty fields.
How to Add This
- In your email template, use HTML with inline placeholders for your form fields. For example:
<div style="min-height:0">{{field1}}</div> <div style="min-height:0">{{field2}}</div> <div style="min-height:0">{{field3}}</div>
- Replace field1, field2, and field3 with the exact field names from your form.
When the email is generated, any empty field will collapse without leaving blank lines.
Now your emails will automatically show only the fields that have values, creating a cleaner, more readable message.
19. Setting a User Field by Querying a List
This rule allows you to automatically populate a user field by looking up a related value from another SharePoint list. It’s useful for assigning tasks, coordinators, or contacts based on selections elsewhere in the form.
Why use it?
Automatically sets a user field based on another field’s value and Reduces manual entry and errors. Useful for assigning responsible users.
How to Add This
In your form: Go to the Logic tab and click + Add a Rule.
Set the Condition: Choose None (or a condition you want the rule to run under).
Add the Step: In the Steps section, drag the step: Execute JS and paste in the code below:
let searchedValue = getValue('DepartmentLookup'); let targetListInternalName = "Departments"; let targetListFieldInternalName = 'ID'; getFilteredFirstListItem(searchedValue.id, targetListInternalName, targetListFieldInternalName, ["Title", "Coordinator"]).then(data => { setValue('Comments', data.Coordinator.length > 0 ? data.Coordinator[0].displayName : "<empty>"); setValue('Coordinator', data.Coordinator.length > 0 ? data.Coordinator[0] : null); });- Now, when the rule runs, the user field (Coordinator) will automatically populate based on the selection in DepartmentLookup, and any relevant comments will also be filled.
21. Setting a Rich Text / Enhanced Rich Text Field
This rule allows you to populate a Rich Text or Enhanced Rich Text field dynamically. It’s useful for displaying formatted content such as line breaks, lists, or HTML elements directly in your form.
Why use it?
Automatically inserts formatted content without manual editing.How to Add This
In your form: Go to the Logic tab and click + Add a Rule.
Set the Condition: Choose None (or any condition you want the content to appear under).
Add the Step: In the Steps section, drag the step: Execute JS and paste in one of the code examples below:
Example 1 – Line Breaks:
setValue("MultipleLinesOfText", "Alice Johnson<br/>Brian Kelly<br/>Carla O'Neill");Example 2 – Ordered List:
setValue("MultipleLinesOfText", "<ol><li>Alice Johnson</li><li>Brian Kelly</li><li>Carla O'Neill</li></ol>");Now, when the rule runs, the MultipleLinesOfText field will display formatted content with line breaks or a numbered list.
22. Show a Toast Message (Small Temporary Notification)
This rule displays a toast message to the user. It’s useful for giving immediate feedback, warnings, or confirmations without changing the form layout.
Why use it?
Alerts users about missing or incorrect information. Provides a non-intrusive notification directly on the form.How to Add This
In your form: Go to the Logic tab and click + Add a Rule.
Set the Condition: Choose the condition under which the message should appear (e.g., a required field is empty).
Add the Step: In the Steps section, drag the step: Execute JS and paste in the code below:
showMessage("One or more mandatory fields are missing data, please review the form", "error");Now, when the condition is met, a toast message will appear with your custom text and style (error, success, or info).
23. Duplicate a Form (Without a Linked List)
This approach allows users to duplicate an existing form’s data into a new form. It requires two rules: one to populate the fields and another to add a button for triggering the duplication.
Why use it?
Speeds up form creation by reusing existing data.
Ensures consistency and reduces manual entry errors.
Rule 1: Populate Form Fields from an Existing Form
Condition: Form is in Create Mode
Steps:
- In the Logic tab, click + Add a Rule.
- Set the Condition: Form is in Create Mode.
- Add the Step: Execute JS and paste the code below:
const formID = queryParam("copyFrom"); if (formID) { getFilteredFirstListItem(formID, "Forms", "ID", [ "ID", "Requestor", "WWID", "JobTitle", "Department", "Area", "Shift", "Manager", "DepartmentManager", "Title", "AcademicInstituteChoice", "Qualification", "Level", "ECTSCredits", "ModeOfDelivery", "CourseLink", "FEStatus", "Currency", "SpringboardFunded", "Question1", "Question2", "Question2b" ]).then(data => { setValue('Requestor', data.Requestor); setValue('WWID', data.WWID); setValue('JobTitle', data.JobTitle); setValue('Department', data.Department); setValue('Area', data.Area); setValue('Shift', data.Shift); setValue('Manager', data.Manager); setValue('DepartmentManager', data.DepartmentManager); setValue('Title', data.Title); setValue('AcademicInstituteChoice', data.AcademicInstituteChoice); setValue('Qualification', data.Qualification); setValue('Level', data.Level); setValue('ECTSCredits', data.ECTSCredits); setValue('ModeOfDelivery', data.ModeOfDelivery); setValue('CourseLink', data.CourseLink); setValue('FEStatus', data.FEStatus); setValue('Currency', data.Currency); setValue('SpringboardFunded', data.SpringboardFunded); setValue('Question1', data.Question1); setValue('Question2', data.Question2); setValue('Question2b', data.Question2b); }); }Now, when the form is in Create Mode with a copyFrom parameter in the URL, the fields are automatically populated with the existing form data.
Rule 2: Add a “Duplicate this Request” Button
Condition: Form is in View Mode or Edit Mode
Steps:
- In the Logic tab, click + Add a Rule.
- Set the Condition: Form is in View Mode or Edit Mode.
- Add the Step: Execute JS and paste the code below:
const formContext = getFormContext(); let url = formContext.formCreateUrl; url = url + "&form_copyFrom=" + getValue("ID"); addCustomButton("Duplicate this Request", "OpenInNewTab", url);This adds a button that opens a new form pre-filled with the current form’s data.
24. Duplicate a Form (With a Linked List)
This approach allows users to duplicate a form including any linked sublist items. It uses multiple rules: one to initialise variables and copy data, another to add a button, and optionally a third to copy the user’s previous form.
Why use it?
Reuses both the main form fields and any linked sublist items. Reduces repetitive data entry for recurring forms like purchase orders.
Rule 1: Initialise Variables and Copy Form Data
Run Once
Steps:
- In the Logic tab, click + Add a Rule.
- Set the Condition: Run Once.
- Add the Step: Execute JS and paste the code below:
// Initialize global variables window.supplier = null; window.supplierItems = []; // Function to copy main form and linked sublist items window.copyFormValues = function (formId) { // Copy main form fields getFilteredFirstListItem(formId, "Purchase Orders", "ID", ["ID", "Supplier", "OrderFor", "Note", "DateReceived"]).then(data => { setValue('Supplier', data.Supplier); setValue('OrderFor', data.OrderFor); setValue('Note', data.Note); setValue('DateReceived', data.DateReceived); }); // Copy linked sublist items getFilteredListItems(formId, "Sublist_purchaseOrderItems", "PurchaseOrderId", ["LineItem", "Description", "Title", "Quantity", "UnitPrice", "VAT", "Supplier"]).then(data => { // Clear existing items setValue("Sublist_purchaseOrderItems", []); // Insert copied items insertSublistItems("Sublist_purchaseOrderItems", data); }); } // Auto-copy if "copyFrom" parameter exists in URL var existingCopyFromId = queryParam('copyFrom') || 0; if (existingCopyFromId > 0) { window.copyFormValues(existingCopyFromId); }Rule 2: Add a “Duplicate this PO” Button
Condition: Form is in View Mode or Edit Mode
Steps:
- In the Logic tab, click + Add a Rule.
- Set the Condition: Form is in View Mode or Edit Mode.
- Add the Step: Execute JS and paste the code below:
const formContext = getFormContext(); let url = formContext.formCreateUrl; url = url + "&form_copyFrom=" + getValue("ID"); addCustomButton("Duplicate this PO", "OpenInNewTab", url);Optional Rule 3: Copy User’s Previous Form
Condition: Form is in Create Mode
Steps:
- In the Logic tab, click + Add a Rule.
- Set the Condition: Form is in Create Mode.
- Add the Step: Execute JS and paste the code below:
addCustomButton("Copy my previous order", "Copy", copyUserPreviousForm); function copyUserPreviousForm() { var submitter = getCurrentUser(); getFilteredListItems(submitter.displayName, "Purchase Orders", "Author", ["ID", "Supplier", "OrderFor", "Note", "DateReceived"]).then(data => { var last = _.first(_.orderBy(data, ["ID"], ["desc"])); if (last) { window.copyFormValues(last.ID); showMessage('Last values copied.', 'info'); } else { showMessage("No previous entries found.", "warning"); } }); }
This setup ensures that both the main form fields and any linked sublist items are copied automatically or via a button, making duplication seamless.
25. Query User Values in a List and Write Them into User Fields
This setup allows you to automatically populate user fields in a form based on a selection in another field (in this case, QualitySystem). It requires two rules: one to define the JavaScript function and one to call it whenever the form changes.
Why use it?
Automatically retrieves the relevant agents and process owner from a lookup list and populates the corresponding user fields, reducing manual entry and errors.
Rule 1: Initialise JS Function
Run Once: True
Conditions: None
Steps:
- In the Logic tab, click + Add a Rule.
- Set the Condition: None (Run Once).
- Add the Step: Execute Custom JS and paste the code below:
var customLogic = function() { var self = this; self.getAgentsAndProcessOwner = function () { let searchedValue = getValue('QualitySystem'); if (searchedValue && self.resolvedId != searchedValue) { let targetListInternalName = "LookupQualitySystem"; let targetListFieldInternalName = 'ID'; getFilteredFirstListItem(searchedValue.id, targetListInternalName, targetListFieldInternalName, ["Agents", "ProcessOwner"]).then(data => { setValue('QualitySystemAgents', data.Agents); setValue('QualityProcessOwner', data.ProcessOwner); self.resolvedId = searchedValue; }); } }; }; window.SFCustomLogic = new customLogic();
Rule 2: Set Agents and Process Owner Based on Selected Quality System
Run Once: False
Conditions: None
Steps:
- In the Logic tab, click + Add a Rule.
- Set the Condition: None.
- Add the Step: Execute Custom JS and paste the code below:
window.SFCustomLogic.getAgentsAndProcessOwner();
How it works:
-
Rule 1 defines a function to fetch the agents and process owner from the LookupQualitySystem list.
-
Rule 2 executes the function whenever the form changes or the QualitySystem field is updated.
-
The results automatically populate the QualitySystemAgents and QualityProcessOwner fields, keeping your form up-to-date with the correct user assignments.
26. Read Values in a Linked List and Write Them into a Multiline Text Field
This setup allows you to automatically populate Multiline Text (MLT) fields in the main form based on items from a linked list. It requires two rules: one to define the JavaScript functions and one to call them whenever the form changes.
Why use it?
Reduces manual data entry by combining values from a linked list into single MLT fields, making it easier to review or export aggregated information.Rule 1: Initialize JS Functions
Run Once: True
Conditions: NoneSteps:
- In the Logic tab, click + Add a Rule.
- Set the Condition: Run Once.
- Add the Step: Execute Custom JS and paste the code below:
// Function to combine TrainingItem values into one MLT field window.getDocumentnumbers = function () { const items = getValue("3f391f85-2d2b-43b9-bafa-b26f8ea8c1ce") || []; const codesText = items.map(item => `${item.TrainingItem}`).join("\n"); setValue("DocNoCombined", codesText); }; // Function to combine Title values into one MLT field window.getDocumenttitles = function () { const items = getValue("3f391f85-2d2b-43b9-bafa-b26f8ea8c1ce") || []; const codesText = items.map(item => `${item.Title}`).join("\n"); setValue("DocTitleCombined", codesText); };Rule 2: Set Fields Based on Related List
Run Once: False
Conditions: NoneSteps:
- In the Logic tab, click + Add a Rule.
- Set the Condition: None.
- Add the Step: Execute Custom JS and paste the code below:
window.getDocumentnumbers(); window.getDocumenttitles();How it works:
Rule 1 defines two functions: one to aggregate TrainingItem values and another for Title values from the linked list.
Rule 2 executes these functions whenever the linked list updates or the form changes.
The aggregated values are written into the DocNoCombined and DocTitleCombined MLT fields for easy reference.
27. Validate Dates in a Form
This setup ensures that date fields maintain a logical order, preventing users from selecting a “desired” or second date that occurs before an “available” or first date.
Why use it?
Prevents data entry errors by validating the relationship between two date fields, ensuring consistency in scheduling or delivery data.
Rule 1: Validate Earliest Available vs Desired Date
Run Once: False
Conditions: NoneSteps:
- In the Logic tab, click + Add a Rule.
- Set the Condition: None.
- Add the Step: Execute Custom JS and paste the code below:
const dateAvailable = getValue("DateAvailable"); const dateDesired = getValue("DateDesired"); if (dateAvailable && dateDesired) { const isAvailableSmallerThanDesired = moment(dateAvailable) < moment(dateDesired); if (!isAvailableSmallerThanDesired) { setErrorMessage("DateDesired", "You can only choose a desired date after the Earliest Available Delivery Date"); } }Rule 2: Validate Two Simple Date Fields (No Time)
Run Once: False
Conditions: NoneSteps:
- In the Logic tab, click + Add a Rule.
- Set the Condition: None.
- Add the Step: Execute Custom JS and paste the code below:
const date1 = getValue("Date1"); const date2 = getValue("Date2"); if (date1 && date2) { if (date2 > date1) { setErrorMessage("Date2", "You can't choose a date after Date 1"); } }How it works:
Rule 1 uses the moment library to compare the “Earliest Available Delivery Date” against the “Desired Date” and displays an error if the logic is violated.
Rule 2 performs a simpler comparison for two date-only fields and prevents selecting an invalid sequence.
Both rules trigger whenever the relevant date fields are updated.
28. Add an “Assign to Me” Link to a User Field
This feature lets users quickly assign a task, record, or request to themselves by clicking a simple “Assign to me” link next to a user field. It uses one rule to initialise the function and another to display the clickable link.
Why use it?
Streamlines assigning ownership without needing to manually search for and select your own name in a user field.Rule 1: Initialise Variables and Create the Assign Function
Run Once: True
Conditions: NoneSteps:
- In the Logic tab, click + Add a Rule.
- Set the Condition: Run Once.
- Add the Step: Execute Custom JS and paste the code below:
SPApi.ensureInitialized(); var ctx = SPApi.context; var web = SPApi.hostWeb; var customLogic = function() { var self = this; self.assignToMe = function () { setCurrentUser("Person"); showMessage("You have been assigned, don't forget to save the form!", "success"); // saveForm(); // Optional: uncomment to auto-save after assigning }; self.initVariables(); }; window.SFCustomLogic = new customLogic();Rule 2: Add the “Assign to Me” Link in the Field Label
Run Once: False
Conditions: NoneSteps:
- In the Logic tab, click + Add a Rule.
- Set the Condition: None.
- Add the Step: Execute Custom JS and paste the code below:
setLabel("Person", 'Person (<a href="javascript:window.SFCustomLogic.assignToMe()">assign to me</a>)');How it works:
Rule 1 initialises SharePoint API context and defines the assignToMe function that sets the “Person” field to the current logged-in user and displays a success message.
Rule 2 dynamically updates the field label to include a clickable assign to me link.
Clicking the link runs the function from Rule 1, instantly assigning the current user.
29. Count the Number of Linked Items and Completed Items
This setup allows you to automatically count all items in a linked list and the number of completed items, displaying the results in read-only numeric fields on the main form.
Why use it?
Provides a quick overview of progress or status by showing both the total number of linked items and how many have been completed, without manual counting.Rule 1: Initialise Counting Functions
Run Once: True
Conditions: NoneSteps:
- In the Logic tab, click + Add a Rule.
- Set the Condition: Run Once.
- Add the Step: Execute Custom JS and paste the code below:
window.countAllLinkedItems = function () { let allItems = _.filter(getValue("8e4d48e5-4e4e-4903-8273-848f52df65b3") || [], function (o) { return !o.sintelForms_isDeleted; }) || []; return allItems.length; } window.countCompletedLinkedItems = function () { let allItems = _.filter(getValue("8e4d48e5-4e4e-4903-8273-848f52df65b3") || [], function (o) { return !o.sintelForms_isDeleted && o.Complete; }) || []; return allItems.length; }- Step 2: Create Calculated Read-Only Numeric Fields
- Fields:
Total Items: Set formula to: window.countAllLinkedItems()
Completed Items: Set formula to: window.countCompletedLinkedItems()
- How it works:
- countAllLinkedItems filters the linked list to exclude deleted items and returns the total count.
- countCompletedLinkedItems filters the linked list to exclude deleted items and only include those marked as complete.
Both formulas are placed in read-only numeric fields to display the counts dynamically on the main form.
30. Get UserProfile Properties and Populate Fields on the Form
This setup automatically retrieves the selected user’s profile information and populates multiple fields on the form, including name, contact details, department, manager, and profile picture.
Why use it? Reduces manual data entry by automatically filling in all relevant user information when a person is selected in a form field.
Rule 1: Fetch UserProfile Properties
Run Once: False
Conditions: NoneSteps:
- In the Logic tab, click + Add a Rule.
- Set the Condition: Check field value for ‘Person’ is ” ” which means empty.
- Add the Step: Execute Custom JS and paste the code below:
let user = getValue('Person')[0]; let properties = []; getUserProfile(user, properties).then(data => { setValue('AccountName', data.AccountName); setValue('FirstName', data.FirstName); setValue('LastName', data.LastName); setValue('FullName', data.PreferredName); setValue('WorkPhone', data.WorkPhone); setValue('Department', data.Department); setValue('PersonTitle', data.Title); setValue('SPS-JobTitle', data["SPS-JobTitle"]); setValue('Manager', data.Manager); setValue('PictureURL', data.PictureURL); setValue('UserName', data.UserName); setValue('CellPhone', data.CellPhone); setValue('WorkEmail', data.WorkEmail); setValue('HomePhone', data.HomePhone); setValue('Office', data.Office); setValue('SPS-Location', data["SPS-Location"]); setValue("UserProfileData", JSON.stringify(data)); setValue("PersonFieldData", JSON.stringify(user)); });How it works:
getUserProfile fetches all the user’s profile properties from the system.
Each relevant field is automatically updated on the form using setValue.
Two hidden fields (UserProfileData and PersonFieldData) store the raw JSON for reference or further automation.
31. Output All UserProfile Data to a Multi-Line Text Field
This setup allows you to store the full user profile JSON in a multi-line text field on the form for debugging, reporting, or further automation.
Why use it?
Captures all available user profile properties in a single field, making it easy to reference or export later.Rule: Store Full UserProfile JSON
Run Once: False
Conditions: NoneSteps:
- In the Logic tab, click + Add a Rule.
- Set the Condition: none (runs whenever the form loads or the user field changes).
- Add the Step: Execute Custom JS and paste the code below:
// Assume `data` is the user profile object retrieved from getUserProfile setValue("SomeTextField", JSON.stringify(data));How it works:
- data is the JSON object returned from getUserProfile.
- JSON.stringify(data) converts the object into a string.
- setValue writes this string into a multi-line text field (SomeTextField).
- This is useful when you want a full dump of user profile information on the form for reference, logging, or advanced logic.
32. Disable Adding New Comments When Form Status is Completed
This setup prevents users from adding new comments once a form’s status is marked as “Completed.”
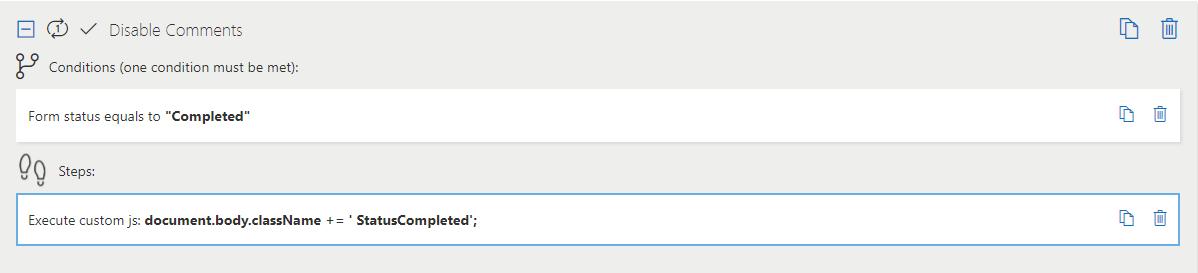
Why use it? Ensures that completed forms cannot receive further comments, keeping the record clean and preventing accidental updates.
Rule: Disable Comments on Completed Forms
Run Once: False
Conditions: Form status equals “Completed” (only applies when this condition is met)Steps:
- In the Logic tab, click + Add a Rule.
- Set the Condition: Form status equals “Completed”
- Add the Step: Execute Custom JS and paste the code below:
document.body.className += ' StatusCompleted';
33. Set Relevant Dates Based on Workflow Status
This setup automatically populates date fields when the form status changes, tracking the workflow progress.
Why use it?
Keeps a timestamp for each workflow stage, ensuring you know when each step occurred without manual input.Rule: Update Dates When Status Changes
Run Once: False
Conditions: NoneSteps:
- In the Logic tab, click + Add a Rule.
- Add the Step: Execute Custom JS and paste the code below:
let workflowStatus = getValue("SintelFormsStatus"); let dateDraft = getValue("DateDraft"); let dateES = getValue("DateES"); let dateOPS = getValue("DateOPS"); let dateEHS = getValue("DateEHS"); let dateQA = getValue("DateQA"); let dateComplete = getValue("DateComplete"); // When Draft if (workflowStatus == "Draft" && !dateDraft) { setValue("DateDraft", new Date().toISOString()); } // When With Execution Systems else if (workflowStatus == "With Execution Systems" && !dateES) { setValue("DateES", new Date().toISOString()); } // When With OPS else if (workflowStatus == "With OPS" && !dateOPS) { setValue("DateOPS", new Date().toISOString()); } // When With EHS else if (workflowStatus == "With EHS" && !dateEHS) { setValue("DateEHS", new Date().toISOString()); } // When With QA else if (workflowStatus == "With QA" && !dateQA) { setValue("DateQA", new Date().toISOString()); } // When Completed else if (workflowStatus == "Completed" && !dateComplete) { setValue("DateComplete", new Date().toISOString()); }
How it works:
- Checks the current workflow status of the form.
- If the corresponding date field is empty, it sets it to the current date and time using toISOString().
- Ensures each workflow stage is timestamped automatically.