Search for answers or browse articles about Sintel BI
Creating a Custom Landing Page in Sintel BI with CSS
Creating a Custom Landing Page in Sintel BI with CSS
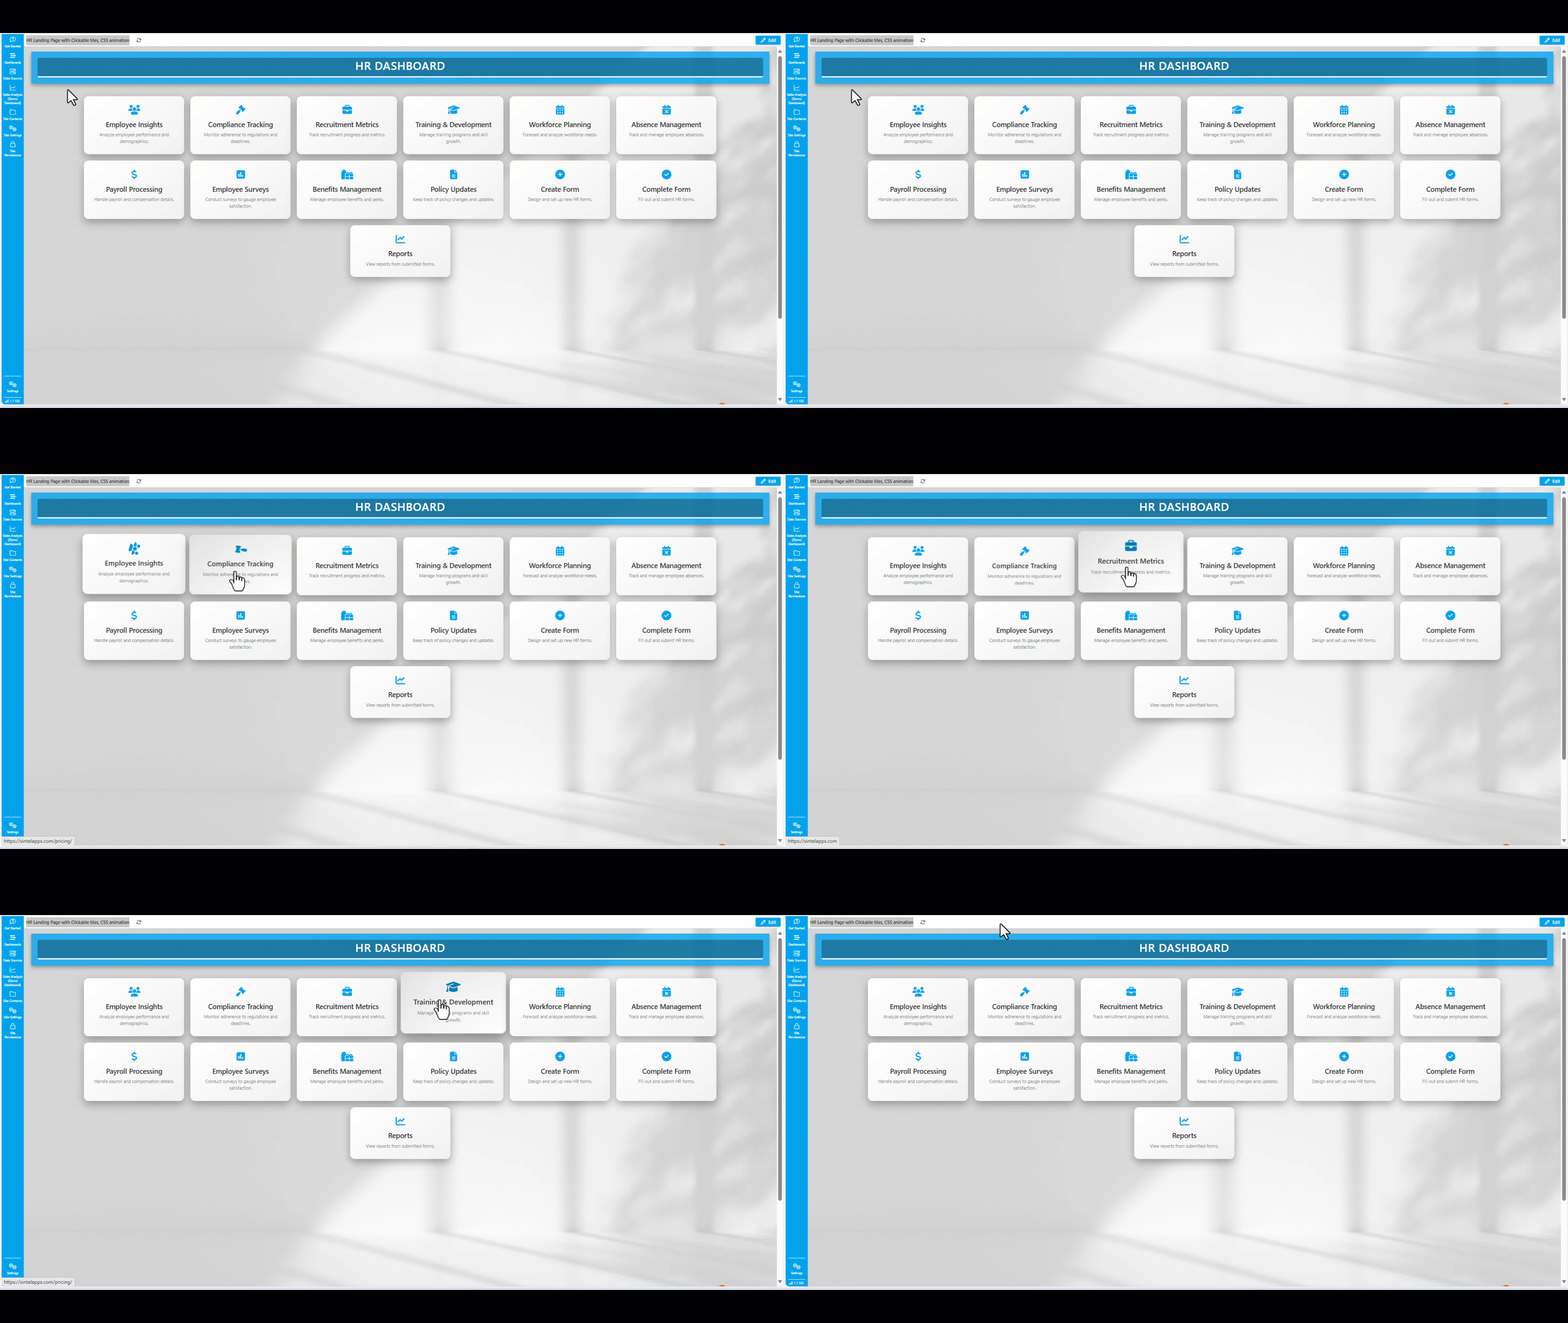
As a Sintel BI user, you might want to customise your dashboard landing page to create a more engaging, branded experience. This advanced guide will walk you through creating a custom landing page using CSS and HTML, enabling you to enhance your dashboard’s look and feel.

Setting Up Your Landing Page
- Create a New Dashboard: Start by adding a new dashboard in Sintel BI. Name it something descriptive, like “Landing Page,” and save it.
- Designate the Landing Page:
- Navigate to the Settings of your Sintel BI instance.
- Under General, find the Landing Page option and select your newly created “Landing Page” dashboard.
- Save your changes.
- Set as SharePoint Homepage (Optional): If you want this landing page to also serve as the SharePoint site homepage, you’ll need to make Sintel BI the site’s homepage. Follow the instructions provided in step 3 of the configuration article to do so.
Customising the Landing Page with CSS
Now that you have a blank dashboard set as your landing page, it’s time to customise its appearance using CSS.

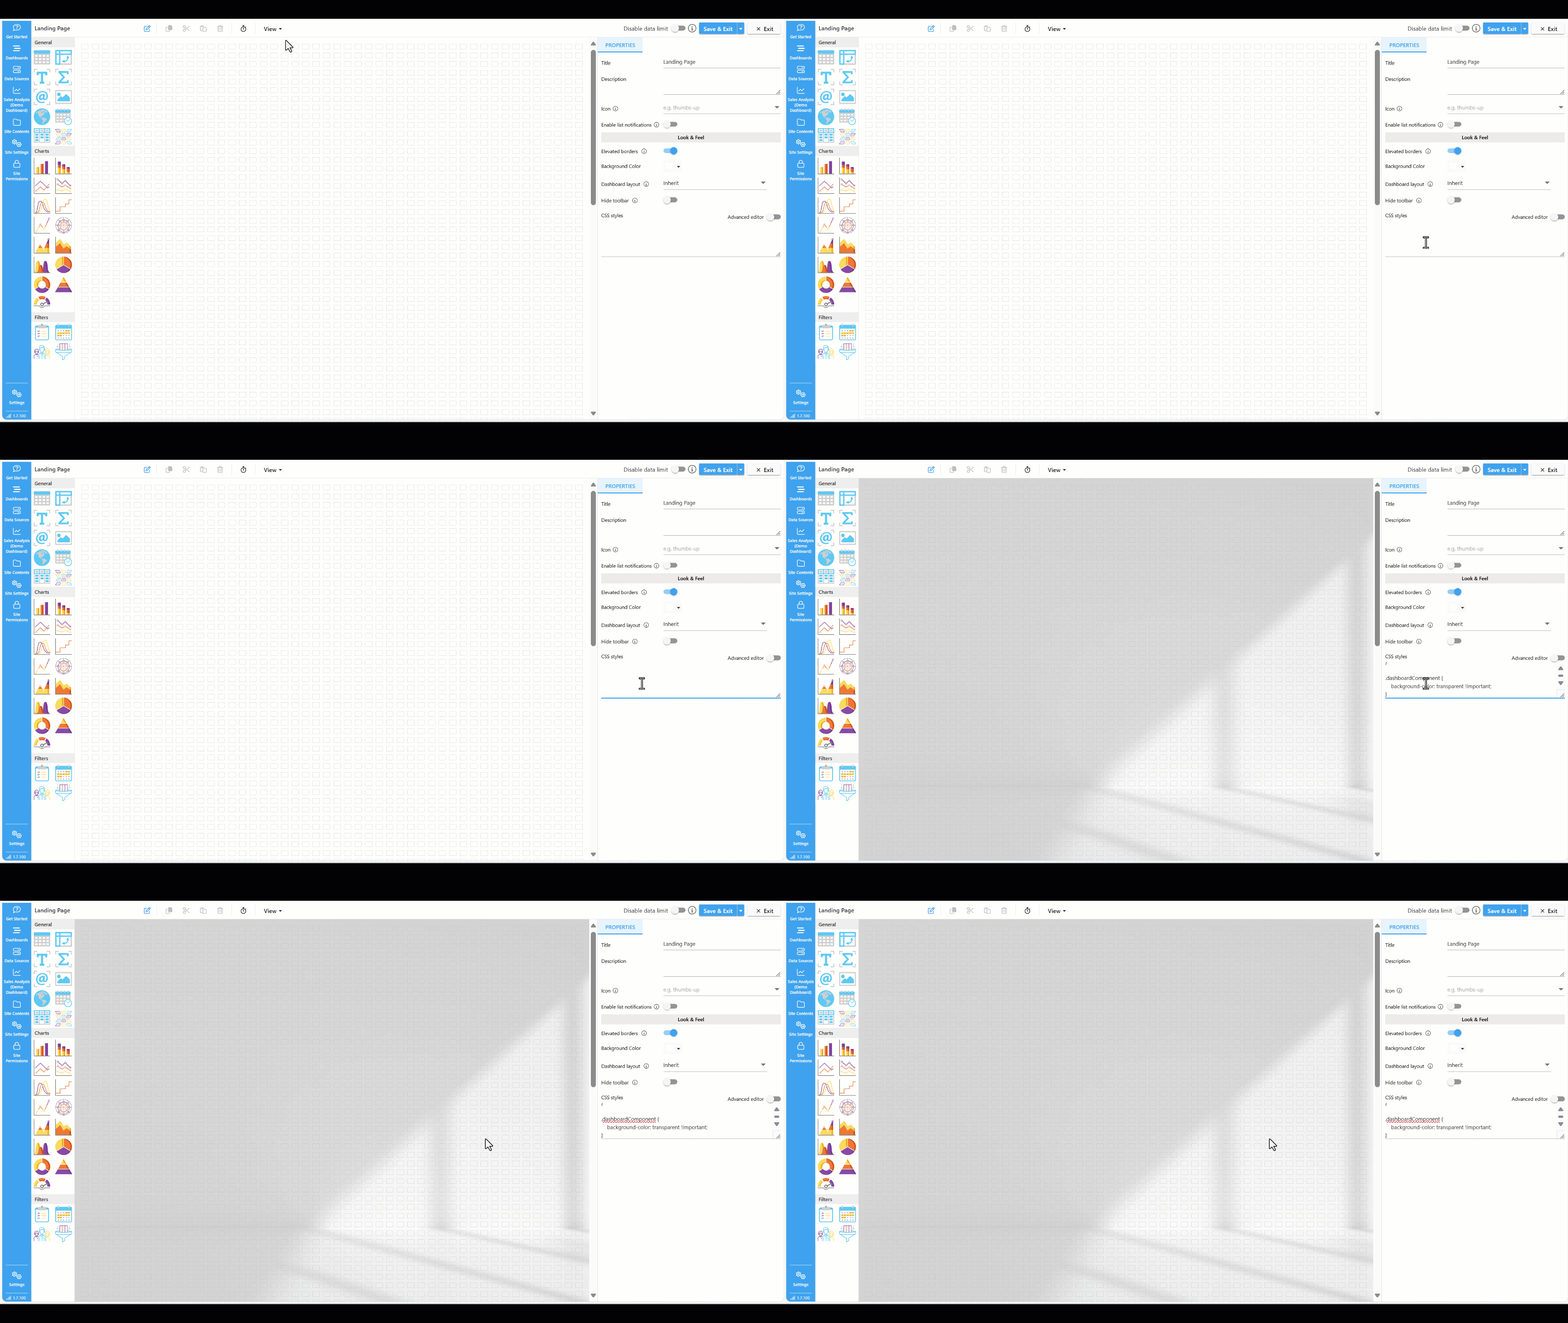
- Access the CSS Editor:
- Go to your “Landing Page” dashboard in edit mode.
- Click on the empty dashboard area to bring up the Look & Feel settings on the right-hand side.
- Find the CSS Styles section and paste in your custom CSS.
Here’s an example of CSS you can use:
/* General body styling with background image and overlay */
.dashboardBody {
    font-family: 'Montserrat', sans-serif;
    background: url('https://s3.eu-west-1.amazonaws.com/sintel.workspace/Amy/Images%20for%20BI%20dashboards/White%20Black%20Minimalist%20Natural%20Light%20Room%20Zoom%20Background.jpg') no-repeat center center fixed;
    background-size: cover;
    background-position: center;
}

/* Header styling with enhanced design */
header {
    background: rgba(0, 162, 237, 0.8);
    /* Semi-transparent header background */
    color: #fff;
    padding: 20px;
    text-align: center;
    box-shadow: 0 6px 12px rgba(0, 0, 0, 0.3);
    position: relative;
    margin-bottom: 20px;
}

header h1 {
    font-size: 36px;
    margin: 0;
    font-weight: 600;
    text-transform: uppercase;
    letter-spacing: 1px;
    padding-bottom: 10px;
    border-bottom: 4px solid #fff;
    background: rgba(0, 0, 0, 0.3);
    border-radius: 5px;
}

/* Tile container styling with responsive layout */
.tile-container {
    display: flex;
    flex-wrap: wrap;
    gap: 20px;
    justify-content: center;
    padding: 20px;
    position: relative;
    z-index: 1;
}

/* Tile styling with modern effects */
.tile {
    text-align: center;
    width: 260px;
    cursor: pointer;
    padding: 30px;
    border-radius: 15px;
    background: linear-gradient(145deg, #ffffff, #f1f1f1);
    box-shadow: 0 10px 25px rgba(0, 0, 0, 0.3);
    transition: transform 0.6s ease, box-shadow 0.6s ease, background 0.6s ease;
    color: #333;
    font-size: 16px;
    position: relative;
    overflow: hidden;
}

/* Tile hover animation with gradient effect */
.tile::before {
    content: '';
    position: absolute;
    top: 0;
    left: 0;
    width: 100%;
    height: 100%;
    background: radial-gradient(circle, rgba(255, 255, 255, 0.3), transparent);
    opacity: 0;
    transition: opacity 0.6s ease;
    z-index: 0;
}

.tile:hover::before {
    opacity: 1;
}

.tile:hover {
    transform: translateY(-15px) scale(1.05);
    background: linear-gradient(145deg, #e0e0e0, #ffffff);
    box-shadow: 0 20px 35px rgba(0, 0, 0, 0.35);
}

/* Icon styling with zoom and rotate animation */
.tile .icon {
    font-size: 30px;
    margin-bottom: 15px;
    color: #00a2ed;
    transition: transform 0.4s ease, color 0.4s ease;
    display: inline-block;
    /* Necessary for transform effects */
}

/* Tile hover effect with zoom and rotate animation */
.tile:hover .icon {
    color: #007bb5;
    transform: scale(1.2) rotate(360deg);
}

/* Title styling within tiles */
.tile .title {
    font-weight: 600;
    font-size: 22px;
    margin-bottom: 10px;
    color: #333;
    z-index: 1;
}

/* Description styling within tiles */
.tile .description {
    font-size: 14px;
    color: #7f8c8d;
    line-height: 1.5;
    z-index: 1;
}

/* Link styling within tiles */
.tileLink {
    text-decoration: none;
    color: inherit;
    position: relative;
    display: flex;
    flex-direction: column;
    align-items: center;
}

/* Responsive design for smaller screens */
@media screen and (max-width: 768px) {
    .tile-container {
        flex-direction: column;
        align-items: center;
    }

    .tile {
        width: 90%;
        max-width: 360px;
        margin: 10px 0;
    }

    header h1 {
        font-size: 28px;
    }
}

[componentid] {
    background-color: transparent !important;
    box-shadow: none !important;
}

.dashboardComponent {
    background-color: transparent !important;
}
Adding the HTML Content
After styling with CSS, you can add content using HTML.

- Add a Text Component:
- Drag and drop a text component onto your dashboard.
- Switch to the code view by clicking the </> icon.
- Insert HTML:
- Paste your custom HTML to structure the content within your tiles. Here’s an example:
<meta charset="UTF-8"><meta name="viewport" content="width=device-width, initial-scale=1.0"><title>HR Dashboard</title><header>
<h1>HR Dashboard</h1>
</header><div class="tile-container">
<!-- Existing Tiles -->
<div class="tile">
<a class="tileLink" href="https://sintelapps.com/" aria-label="Employee Insights">
<i class="icon fas fa-users"></i>
<div class="title">Employee Insights</div>
<div class="description">Analyze employee performance and demographics.</div>
</a>
</div>
<div class="tile">
<a class="tileLink" href="https://sintelapps.com/pricing/" aria-label="Compliance Tracking">
<i class="icon fas fa-gavel"></i>
<div class="title">Compliance Tracking</div>
<div class="description">Monitor adherence to regulations and deadlines.</div>
</a>
</div>
<div class="tile">
<a class="tileLink" href="https://sintelapps.com/" aria-label="Recruitment Metrics">
<i class="icon fas fa-briefcase"></i>
<div class="title">Recruitment Metrics</div>
<div class="description">Track recruitment progress and metrics.</div>
</a>
</div>
<div class="tile">
<a class="tileLink" href="https://sintelapps.com/pricing/" aria-label="Training and Development">
<i class="icon fas fa-graduation-cap"></i>
<div class="title">Training & Development</div>
<div class="description">Manage training programs and skill growth.</div>
</a>
</div>
<div class="tile">
<a class="tileLink" href="https://sintelapps.com/" aria-label="Workforce Planning">
<i class="icon fas fa-calendar-alt"></i>
<div class="title">Workforce Planning</div>
<div class="description">Forecast and analyze workforce needs.</div>
</a>
</div>
<div class="tile">
<a class="tileLink" href="https://sintelapps.com/pricing/" aria-label="Absence Management">
<i class="icon fas fa-calendar-times"></i>
<div class="title">Absence Management</div>
<div class="description">Track and manage employee absences.</div>
</a>
</div>
<div class="tile">
<a class="tileLink" href="https://sintelapps.com/" aria-label="Payroll Processing">
<i class="icon fas fa-dollar-sign"></i>
<div class="title">Payroll Processing</div>
<div class="description">Handle payroll and compensation details.</div>
</a>
</div>
<div class="tile">
<a class="tileLink" href="https://sintelapps.com/pricing/" aria-label="Employee Surveys">
<i class="icon fas fa-poll"></i>
<div class="title">Employee Surveys</div>
<div class="description">Conduct surveys to gauge employee satisfaction.</div>
</a>
</div>
<div class="tile">
<a class="tileLink" href="https://sintelapps.com/" aria-label="Benefits Management">
<i class="icon fas fa-gifts"></i>
<div class="title">Benefits Management</div>
<div class="description">Manage employee benefits and perks.</div>
</a>
</div>
<div class="tile">
<a class="tileLink" href="https://sintelapps.com/pricing/" aria-label="Policy Updates">
<i class="icon fas fa-file-alt"></i>
<div class="title">Policy Updates</div>
<div class="description">Keep track of policy changes and updates.</div>
</a>
</div>
<!-- New Tiles for Forms -->
<div class="tile">
<a class="tileLink" href="https://sintelapps.com/" aria-label="Create Form">
<i class="icon fas fa-plus-circle"></i>
<div class="title">Create Form</div>
<div class="description">Design and set up new HR forms.</div>
</a>
</div>
<div class="tile">
<a class="tileLink" href="https://sintelapps.com/pricing/" aria-label="Complete Form">
<i class="icon fas fa-check-circle"></i>
<div class="title">Complete Form</div>
<div class="description">Fill out and submit HR forms.</div>
</a>
</div>
<div class="tile">
<a class="tileLink" href="https://sintelapps.com/" aria-label="Reports">
<i class="icon fas fa-chart-line"></i>
<div class="title">Reports</div>
<div class="description">View reports from submitted forms.</div>
</a>
</div>
</div>
Additional Example
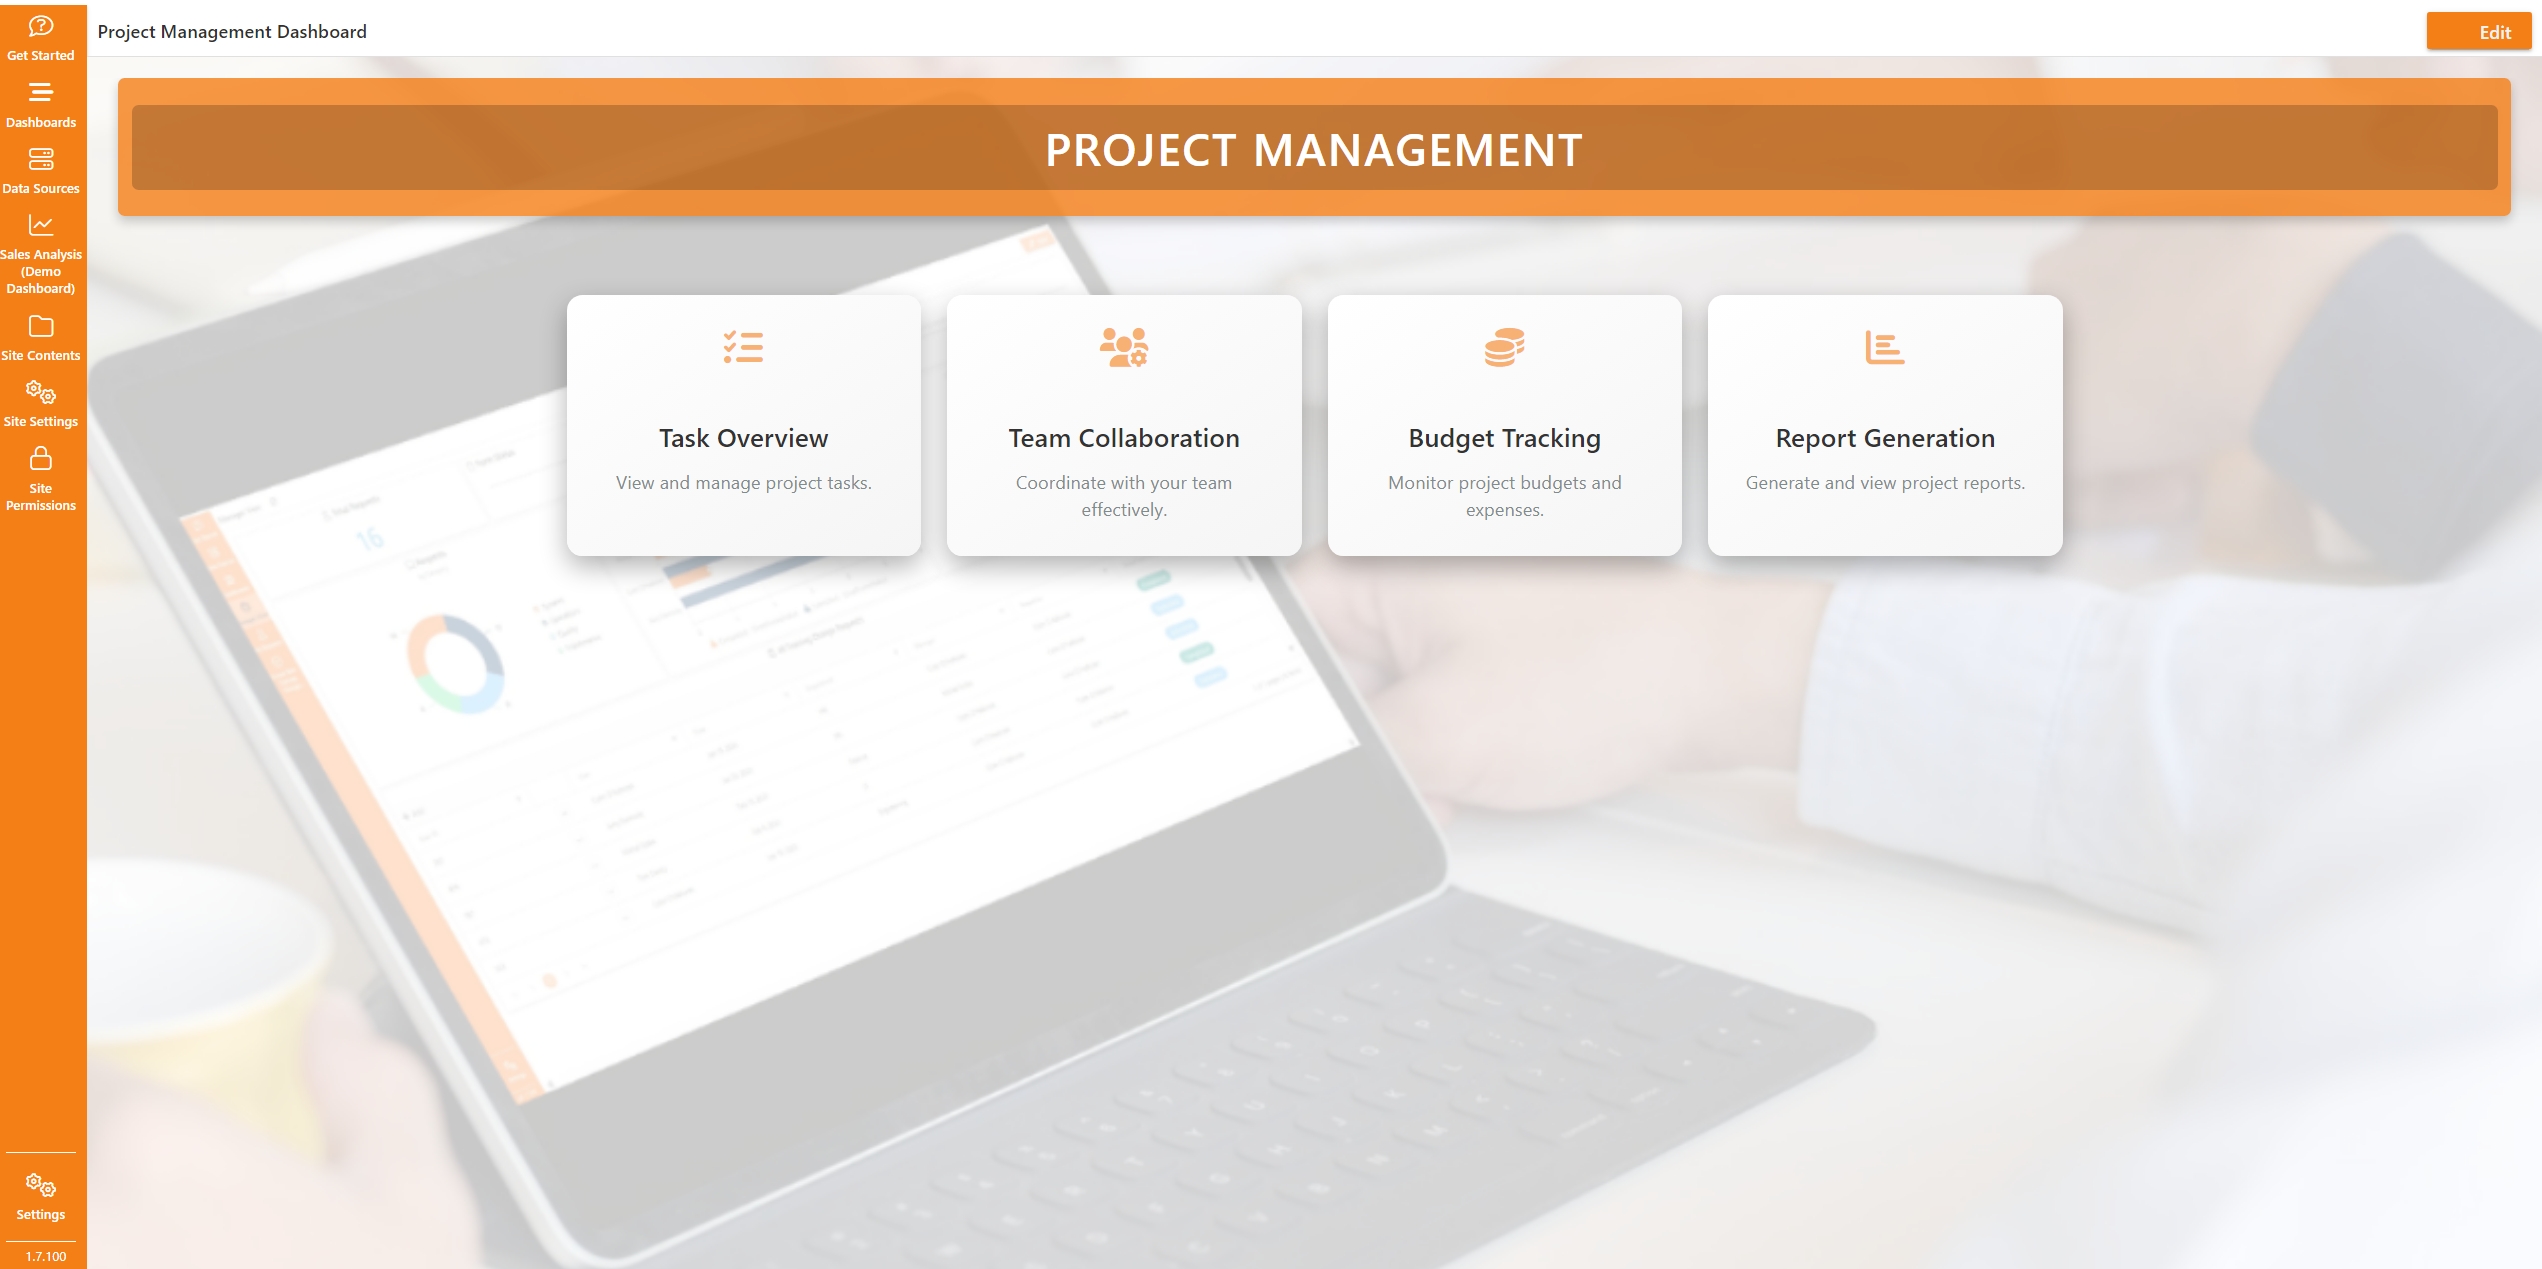
Project Management Landing Page:

CSS:
/* General body styling with background image and overlay */
.dashboardBody {
    font-family: 'Montserrat', sans-serif;
    background: url('https://s3.eu-west-1.amazonaws.com/sintel.workspace/Amy/Images%20for%20BI%20dashboards/Dashboard%20background.png') no-repeat center center fixed;
    background-size: cover;
    background-position: center;
    color: #333;
}

/* Header styling with a minimalist design */
header {
    background: rgba(245, 127, 23, 0.8); /* Semi-transparent header background with theme color */
    color: #fff;
    padding: 20px 10px;
    text-align: center;
    box-shadow: 0 4px 8px rgba(0, 0, 0, 0.2);
    border-radius: 5px;
    margin-bottom: 40px;
}

header h1 {
    font-size: 34px;
    font-weight: 600;
    text-transform: uppercase;
    letter-spacing: 1.5px;
    margin: 0;
    background: rgba(0, 0, 0, 0.2);
    padding: 10px 15px;
    border-radius: 5px;
}

/* Tile container styling with responsive layout */
.tile-container {
    display: flex;
    flex-wrap: wrap;
    gap: 20px;
    justify-content: center;
    padding: 20px;
    position: relative;
    z-index: 1;
}

/* Tile styling with modern effects */
.tile {
    text-align: center;
    width: 220px; /* Slightly reduced size */
    cursor: pointer;
    padding: 25px;
    border-radius: 12px;
    background: linear-gradient(145deg, #ffffff, #f5f5f5);
    box-shadow: 0 8px 20px rgba(0, 0, 0, 0.3);
    transition: transform 0.5s ease, box-shadow 0.5s ease, background 0.5s ease;
    color: #333;
    font-size: 16px;
    position: relative;
    overflow: hidden;
}

/* Tile hover animation with gradient effect */
.tile::before {
    content: '';
    position: absolute;
    top: 0;
    left: 0;
    width: 100%;
    height: 100%;
    background: radial-gradient(circle, rgba(255, 255, 255, 0.3), transparent);
    opacity: 0;
    transition: opacity 0.5s ease;
    z-index: 0;
}

.tile:hover::before {
    opacity: 1;
}

.tile:hover {
    transform: translateY(-12px) scale(1.04);
    background: linear-gradient(145deg, #f5f5f5, #ffffff);
    box-shadow: 0 16px 30px rgba(0, 0, 0, 0.35);
}

/* Icon styling with hover effect */
.icon-wrapper {
    width: 50px;
    height: 50px;
    margin-bottom: 20px;
    display: inline-block;
    opacity: 0.6; /* Initial faded visibility */
    transition: opacity 0.4s ease, transform 0.4s ease;
}

.tile:hover .icon-wrapper {
    opacity: 1; /* Clearer and brighter on hover */
    transform: translateY(-10px);
}

.tile .icon {
    font-size: 30px;
    color: #f57f17;
}

/* Title styling within tiles */
.tile .title {
    font-weight: 600;
    font-size: 20px;
    margin-bottom: 10px;
    color: #333;
    z-index: 1;
}

/* Description styling within tiles */
.tile .description {
    font-size: 14px;
    color: #7f8c8d;
    line-height: 1.5;
    z-index: 1;
}

/* Link styling within tiles */
.tileLink {
    text-decoration: none;
    color: inherit;
    position: relative;
    display: flex;
    flex-direction: column;
    align-items: center;
}

/* Responsive design for smaller screens */
@media screen and (max-width: 768px) {
    .tile-container {
        flex-direction: column;
        align-items: center;
    }

    .tile {
        width: 90%;
        max-width: 340px;
        margin: 15px 0;
    }

    header h1 {
        font-size: 28px;
    }
}

/* Ensure transparency for components in the dashboard */
[componentid] {
    background-color: transparent !important;
    box-shadow: none !important;
}

.dashboardComponent {
    background-color: transparent !important;
}
HTML:
<meta charset="UTF-8"><meta name="viewport" content="width=device-width, initial-scale=1.0"><title>Project Management Dashboard</title><link rel="stylesheet" href="styles.css"><link rel="stylesheet" href="https://cdnjs.cloudflare.com/ajax/libs/font-awesome/6.0.0/css/all.min.css"><header>
<h1>Project Management</h1>
</header><div class="tile-container">
<div class="tile">
<a class="tileLink" href="https://sintelapps.com/" aria-label="Task Overview">
<div class="icon-wrapper">
<i class="icon fas fa-tasks"></i>
</div>
<div class="title">Task Overview</div>
<div class="description">View and manage project tasks.</div>
</a>
</div>
<div class="tile">
<a class="tileLink" href="https://sintelapps.com/pricing/" aria-label="Team Collaboration">
<div class="icon-wrapper">
<i class="icon fas fa-users-cog"></i>
</div>
<div class="title">Team Collaboration</div>
<div class="description">Coordinate with your team effectively.</div>
</a>
</div>
<div class="tile">
<a class="tileLink" href="https://sintelapps.com/" aria-label="Budget Tracking">
<div class="icon-wrapper">
<i class="icon fas fa-coins"></i>
</div>
<div class="title">Budget Tracking</div>
<div class="description">Monitor project budgets and expenses.</div>
</a>
</div>
<div class="tile">
<a class="tileLink" href="https://sintelapps.com/pricing/" aria-label="Report Generation">
<div class="icon-wrapper">
<i class="icon fas fa-chart-bar"></i>
</div>
<div class="title">Report Generation</div>
<div class="description">Generate and view project reports.</div>
</a>
</div>
</div>
Tips for Customising Your Landing Page
- Background Image: To change the background image, replace the URL in the .dashboardBody selector with the URL of your preferred image.
- Colour Schemes: Adjust colours by editing the background, colour, and box-shadow properties in the CSS. For instance, modify the rgba(0, 162, 237, 0.8) in the header to match your brand’s colours.
- Icons: You can use any icon set by swapping out the icon inn the HTML code with an icon of your choice. Font Awesome or inline SVGs are popular options.
- Tile Effects: Experiment with hover effects by adjusting the transform, box-shadow, and background properties in the .tile:hover section.
Final Thoughts
By following this guide and customising the provided code to fit your needs, you can create a visually stunning and functional landing page for your Sintel BI dashboard. Experiment with different styles and layouts to make your landing page not only useful but also a pleasure to interact with!
