Search for answers or browse articles about Sintel BI
How to Merge Data Sources
Merging data sources in Sintel BI allows you to combine information from multiple datasets, helping to create more detailed reports and dashboards. This guide explains how to merge data sources, the different join types (Left Outer and Inner Joins), and when to use them effectively.
When Should You Merge Data Sources?
Merging data sources is useful when:
✅ You need to combine related information from different sources (e.g., linking customer orders with customer details).
✅ You want to enrich a dataset with extra details from another source.
✅ You need to create a unified dashboard from multiple datasets.
Be cautious when merging if:
? Your data sources do not share a clear matching column.
? One dataset has missing or inconsistent data.
? Depending on the chosen join type, some records may appear multiple times or be excluded from the final dataset. Choosing the correct join type ensures the data is merged as expected.
Step-by-Step Guide to Merging Data Sources in Sintel BI
Step 1: Select a Data Source
- Open Sintel BI and navigate to an existing data source.
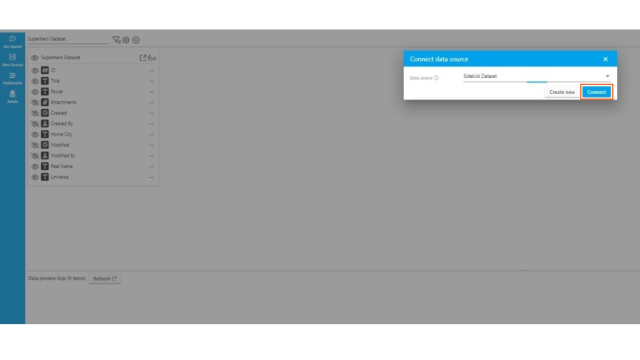
- Click the “+” icon labelled “Connect data source”.
- From the dropdown, select an existing data source.
- Alternatively, click “Create new data source” and connect to:
- A SharePoint list or library (from your SharePoint site or tenant).
- Microsoft SQL Server.
- Excel files.
- Alternatively, click “Create new data source” and connect to:
Step 2: Merge the Data Sources
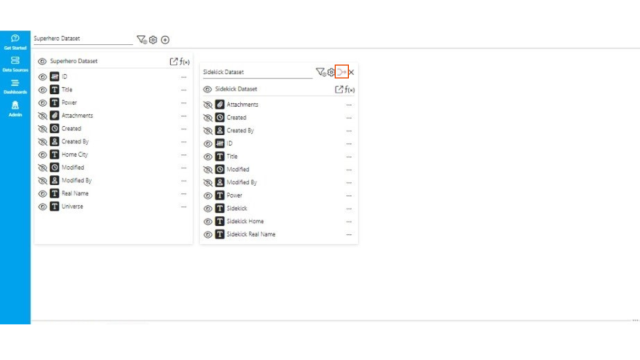
- Once the new data source is connected, a red flashing “Merge” icon will appear.
- Click “Merge”.
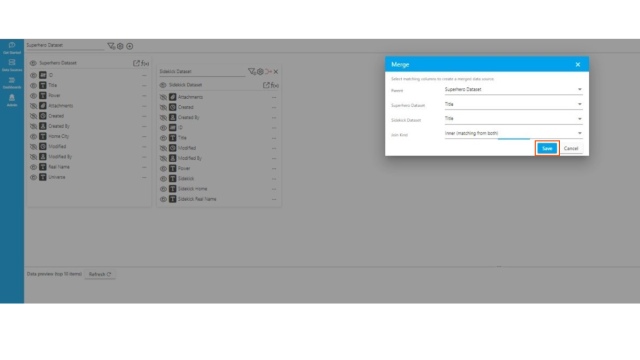
- A dialogue box will open where you will:
- Select matching columns (these should have the same data type and content across the two data sources).
- Choose a Join Type to define how the datasets should be merged.
Step 3: Choose a Join Type
When merging data sources in Sintel BI, you must choose a Join Type. This determines how data from both sources will be combined.
There are two main types of joins available:
Left Outer Join (“All from first, matching from second”)
- Keeps all records from the first dataset.
- Only adds matching data from the second dataset where a match exists.
- If there’s no match, the second dataset’s fields will appear empty (NULL) for that row.
Use this when:
- You want to retain everything from your first dataset.
- You don’t mind if some rows appear empty from the second dataset.
- You’re working with a primary dataset (e.g., a full list of products, customers, or locations) and want to add extra details where available.
Inner Join (“Matching from both”)
- Keeps only records that have a match in both datasets.
- If a record in the first dataset doesn’t have a match in the second, it will not appear in the final merged dataset.
Use this when:
- You only need fully matching data from both sources.
- You don’t want to include any records that are missing a corresponding match.
- You’re filtering down to only relevant records (e.g., finding customers who have both made a purchase and signed up for marketing emails).
Example 1: Left Outer Join – Merging Superheroes with Their Sidekicks
Imagine you have two datasets:
1️⃣ Superheroes Dataset – A list of all superheroes.
2️⃣ Sidekicks Dataset – A list of superheroes that have an official sidekick.
If we merge them using Left Outer Join (keeping all superheroes and adding sidekick data where available), we get:
| Superhero | Sidekick |
|---|---|
| Batman | Robin |
| Superman | |
| Spider-Man | |
| Iron Man | |
| Shrek | Donkey |
| Wonder Woman |
Why use Left Outer Join?
- It keeps all superheroes in the dataset, even if they don’t have a sidekick.
- If a superhero has a sidekick, they appear in the second column.
- If a superhero does not have a sidekick, it appears empty, but the hero is still listed.
This is useful if you want to track which superheroes are solo and might need a sidekick soon.
Example 2: Inner Join – Merging Superheroes with Sidekicks (Only Showing Those with a Sidekick)
Now imagine we use an Inner Join instead. This means we only keep superheroes who actually have a sidekick.
| Superhero | Sidekick |
|---|---|
| Batman | Robin |
| Shrek | Donkey |
Why use Inner Join?
- It removes all superheroes who don’t have a sidekick.
- The final dataset only contains those who have a trusted partner in crime-fighting (or swamp-defending).
This is useful if you only care about dynamic duos and don’t want to see the lone wolves.
Step 4: Save and Refresh the Merged Data Source
- Click “Save” to finalise the merge.
- Click “Refresh” in the Data Preview section to verify the merge.
Handling Duplicate Column Names in Merged Data
If both datasets contain a column with the same name, such as “Date,” it will be difficult to distinguish which column belongs to which dataset once the data is merged.
For example:
- Orders Dataset has a column named “Date” (representing order dates).
- Payments Dataset also has a column named “Date” (representing payment dates).
When these datasets are merged, both columns will appear as “Date”, making it unclear which one corresponds to orders and which one corresponds to payments.
How to Fix This
To avoid confusion, you can rename columns directly within the Sintel BI data source.
- Click the “⋯” (three dots button) next to the column name.
- Select Rename.
- Add a prefix to clarify its source, such as:
- Orders_Date (for the order date).
- Payments_Date (for the payment date).
This ensures that when merging datasets, the data remains clear and easy to use in reports and dashboards.
Best Practices for Merging Data Sources
✔ Check your matching columns – Ensure they are in the same format (e.g., text vs. numbers).
✔ Rename columns with the same name – Add a prefix before merging to differentiate them and maintain clarity in your dataset (e.g., “Orders_Date” and “Payments_Date”).
✔ Use Left Outer Join when keeping all records is important, and Inner Join for clean, focused reports.
By following these steps, you can efficiently merge data sources in Sintel BI, whether you’re analysing business data or assembling the ultimate superhero registry! ?♂️


