
Try it
  • Examples
  • Features
  • Testimonials
  • Partners
  • Pricing
  • Support
    • Sintel Apps Help
    • Sintel Apps Release History
    • Sintel BI Help
    • Sintel BI Release History
    • Webinars
    • How to video series
    • Ask the community
    • Submit a ticket
    • Request a demo
    • Compare us
  • Blog
  • Examples
  • Features
  • Testimonials
  • Partners
  • Pricing
  • Support
    • Sintel Apps Help
    • Sintel Apps Release History
    • Sintel BI Help
    • Sintel BI Release History
    • Webinars
    • How to video series
    • Ask the community
    • Submit a ticket
    • Request a demo
    • Compare us
    • For Schools
  • Blog
  • Get Started
How can we help?

Search for answers or browse articles about Sintel Apps

Filter by categories Clear Results
  • About Sintel Apps

    • What is Sintel Apps? (Product Overview)
    • Understanding the Underlying SharePoint List
  • Sintel Forms to Sintel Apps Migration

    • Sintel Forms Is Now Sintel Apps – What You Need to Do
    • Upgrading from Sintel Forms to Sintel Apps – Migration Guide
    • JavaScript API Differences Between Sintel Forms and Sintel Apps
    • Migrating Workflow History using a custom Microsoft Flow
    • What Does Not Migrate Automatically
    • Migration Checklist
    • Information for IT Administrators – Installing Sintel Apps
    • How to Find Existing Sintel Forms in SharePoint
    • Convert a classic SharePoint site to a modern one
  • Getting Started

    • Add Sintel Apps to Your Microsoft 365 Tenant
    • Configure Sintel Apps on a Site
    • Using Site Collection App Catalogs
  • Designer Overview

    • Sintel Apps Designer – Overview (Tour)
    • Layout Tab (Overview)
    • Workflow Tab (Overview)
    • Settings Tab (Overview)
    • Logic Tab: Create your First Rule (Overview)
  • Layout

    • Layout Tab (Overview)
    • Calculated Fields
    • Fields

      • Text Fields (All types explained)
      • Choice Fields (Dropdown vs Multi-Choice)
      • Lookup Fields
      • Person and Group Fields Posted
      • Number, Currency & Percentage Fields
      • Yes/No Field
      • Date & Date Time Fields
      • Hyperlink Field
      • Picture Fields
      • Related List
      • Related Library
      • Enhanced Rich Text Editor
    • Widgets

      • Attachments
      • HTML Widget
      • Workflow Status Widget
      • Workflow History Widget
      • Buttons
    • Theme

      • Data Import Export
      • Theme & Styling
  • Logic

    • Logic Tab: Create your First Rule (Overview)
    • Understanding Conditions
    • Understanding Steps
    • The JavaScript API

      • Using the JavaScript API in Logic
  • Workflow

    • Workflow Tab (Overview)
    • How to Build Common Workflow Patterns in Sintel Apps
    • How to Configure Workflow Email Notifications
    • Actions

      • The Workflow Actions API Integration
      • Workflow Actions – Configuration and Settings
      • Configuring Power Automate Webhook
    • Statuses

      • Workflow Statuses – Configuration and Settings
  • Settings

    • Settings Tab (Overview)
    • PDF Export
    • Conversations
    • After save script
    • Confirmation Screens
    • License Information
    • Upgrade from Sintel Forms
    • Custom Emails
    • Form Viewer

      • Actions Menu Behavior
      • Enable Concurrent Access
      • After save/action redirect to
      • After close redirect to
    • External Access

      • External Access & Sharing
      • Configuring External Access Permissions
  • Product Updates

    • CSP Content Security Policies (CSP) Enforcement for SPFx Apps
    • Sintel Apps Content Delivery Network CDN
    • Release History
    • How to update Sintel Apps
  • Building Forms

    • How to Create a New List
  • End-to-End Examples

    • Articles coming soon
  • Checklists & Best Practices

    • Sintel Apps – Project Planning & Best Practices
    • Project Requirements Template
  • Advanced Configurations

    • The Workflow Actions API Integration
    • Using the JavaScript API in Logic
    • Configuring External Access Permissions
  • Troubleshooting

    • Failed to query permissions
    • Convert a classic SharePoint site to a modern one
  • Administration

    • Sintel Apps Email Delivery
< All Topics
You are here:
  • Main
  • Layout
  • Calculated Fields

Calculated Fields

Posted9 July 2026
Updated10 July 2026
ByAmy Dermody
0 out of 5 stars
5 Stars 0%
4 Stars 0%
3 Stars 0%
2 Stars 0%
1 Stars 0%

Calculated fields allow you to automatically calculate, format, or generate values based on other fields in a form. Rather than requiring users to enter the same information multiple times, formulas can perform calculations, combine text, apply business rules, and create dynamic content.

Common uses include:

  • Calculating invoice totals
  • Generating full names
  • Creating personalised messages
  • Calculating the number of days since a request was created
  • Assigning a priority score
  • Determining approval requirements
  • Creating usernames or reference numbers

Calculated fields use JavaScript expressions with field tokens, making them both powerful and flexible.

Fields that can contain formulas

Only the following field types can be configured as calculated fields:

  • Text
  • Number
  • Currency
  • Multiline Text

Fields that can be referenced in formulas

Formulas can reference values from:

  • Text
  • Number
  • Currency
  • Multiline Text
  • Choice
  • Lookup

Creating a Calculated Field

  1. Add a Text, Number, Currency, or Multiline Text field.
  2. Open the field properties.
  3. Enable Calculated.
  4. Enter your JavaScript expression.
  5. Save and publish the form.

Once a field is configured as calculated:

  • It becomes read-only
  • It updates automatically whenever referenced fields change
  • Users cannot edit the calculated value manually


Referencing Fields

Fields are referenced using their Internal Name wrapped inside double curly braces.

Example:

{{FirstName}}

To combine two fields:

{{FirstName}} + " " + {{LastName}}


Tip: Always reference the field’s Internal Name, not its display title.


How Calculated Fields Work

Calculated fields:

  • Recalculate whenever referenced fields change.
  • Do not calculate while a form is in View mode.
  • Must exist somewhere in the form layout.
  • Can be hidden if they are only required for workflows or further calculations.


Example 1 – Display a User’s Full Name

You have two single-line text fields that capture a user’s first name and last name, and you want to display their full name elsewhere on the form automatically.
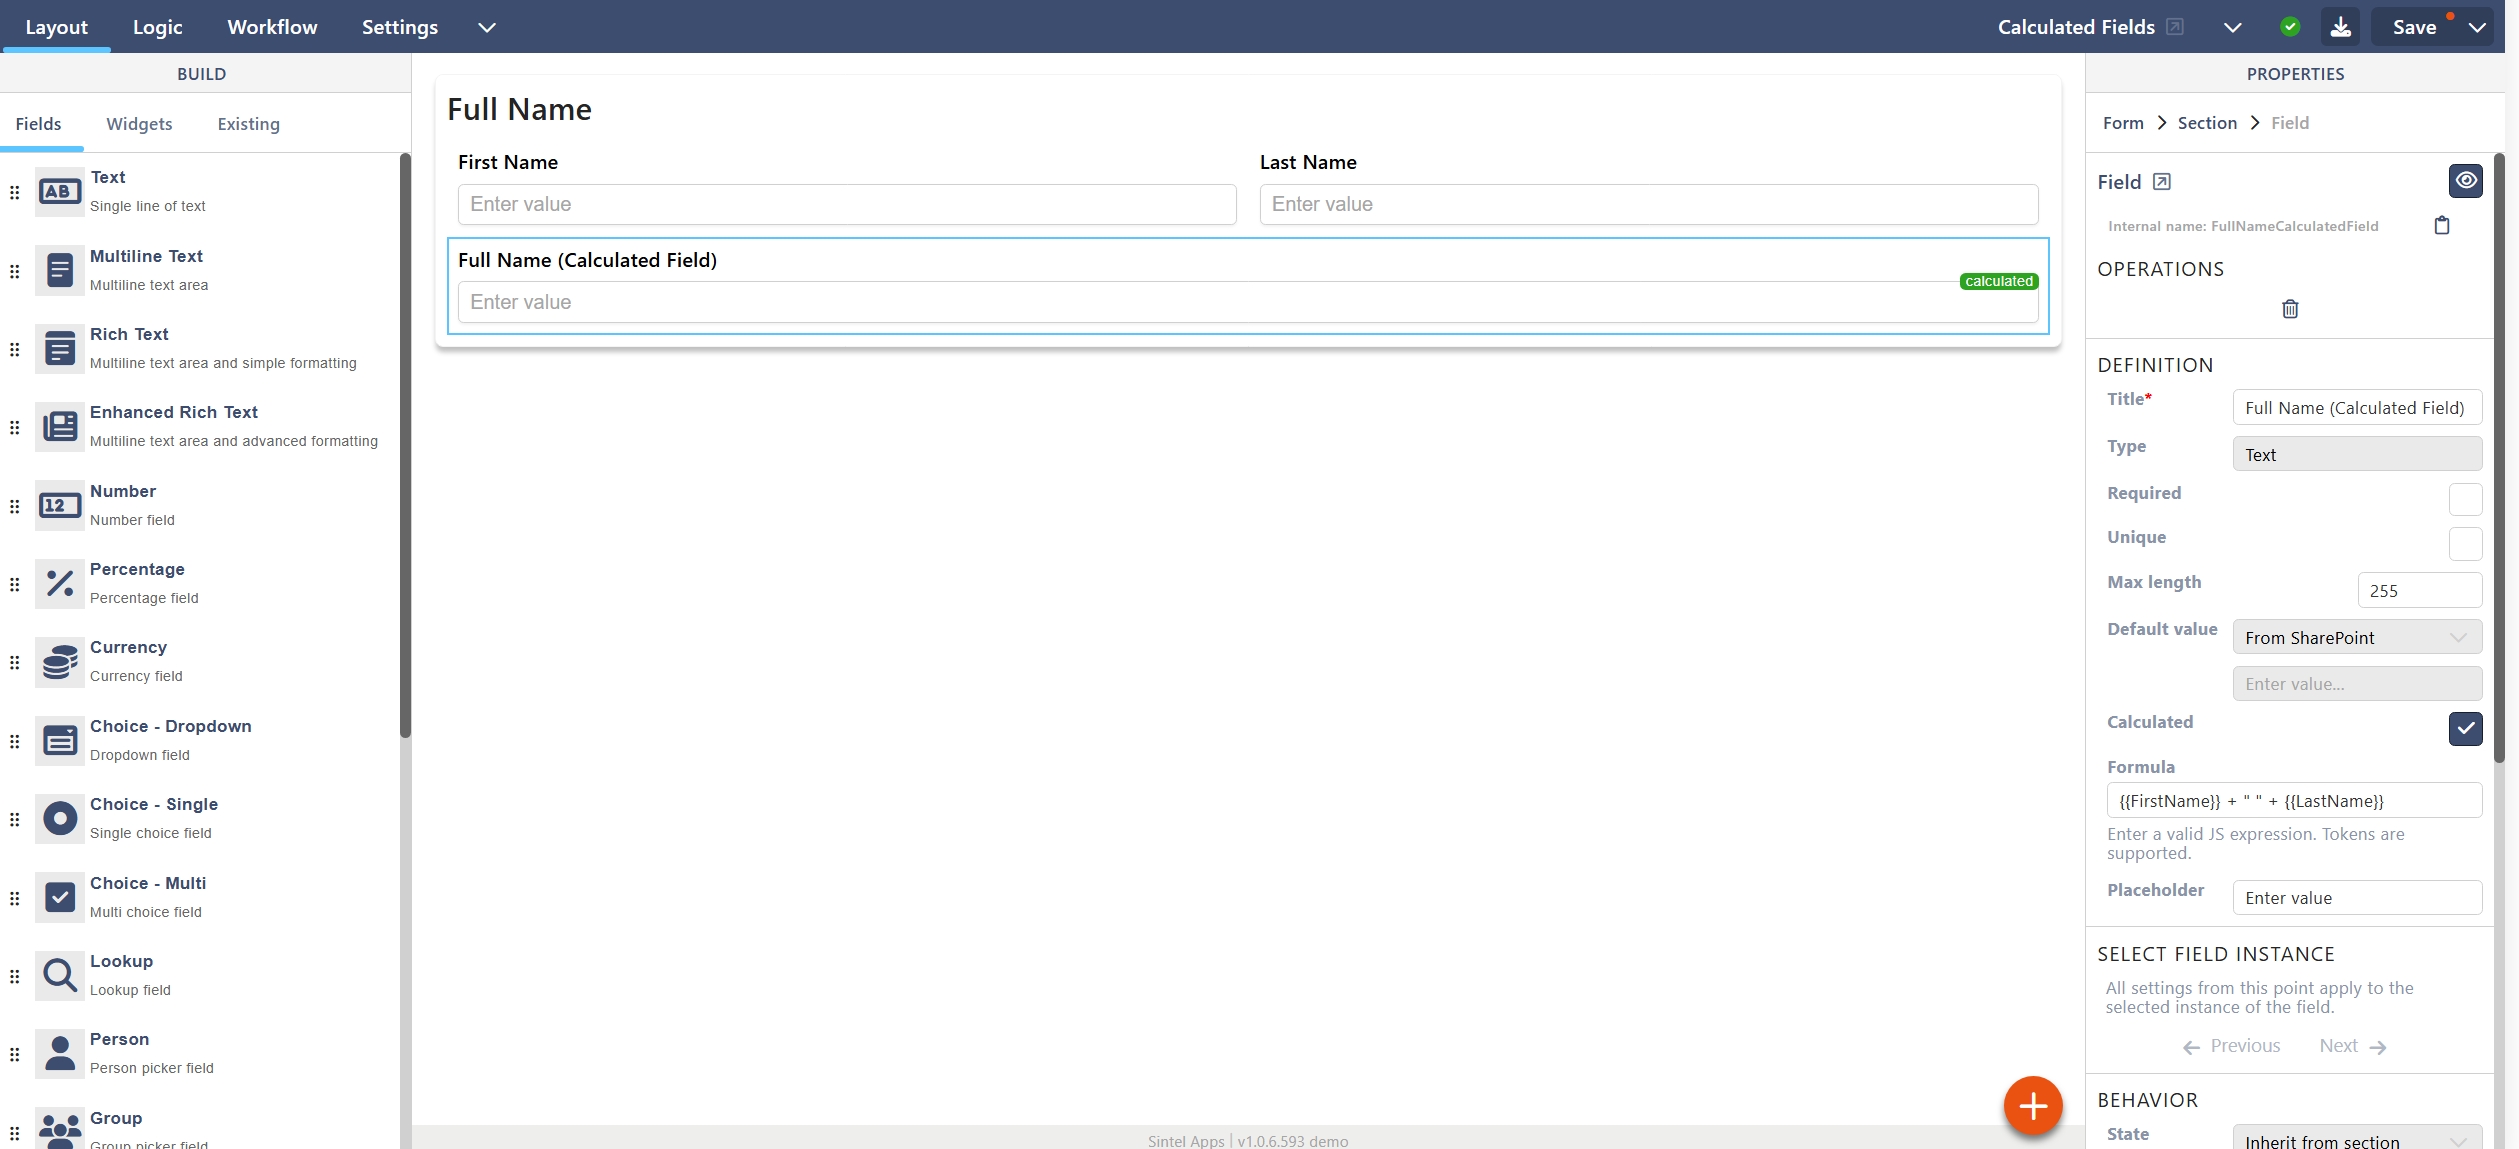
Form Setup

Create the following fields:

Field Type Display Name Internal Name
Text First Name FirstName
Text Last Name LastName
Text Full Name FullName

Open the Full Name field, enable Calculated, and enter the following formula:

{{FirstName}} + " " + {{LastName}}


Result

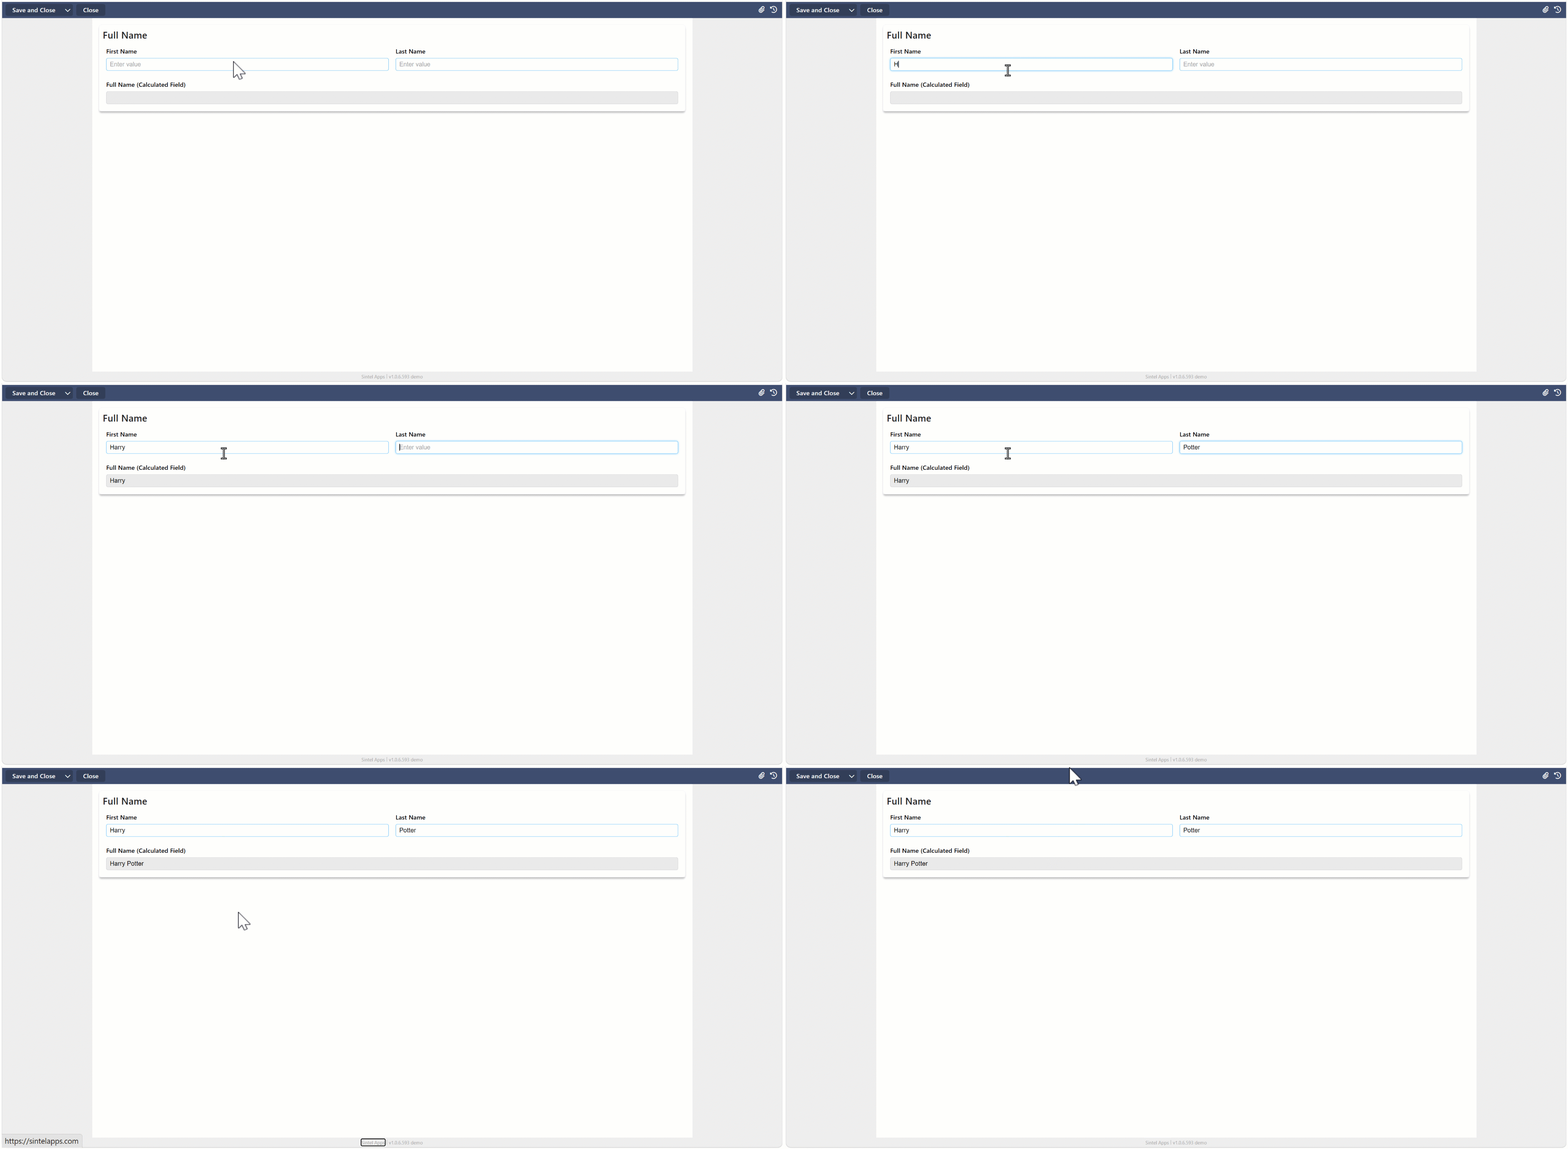
If the user enters:

  • First Name: Harry
  • Last Name: Potter

The Full Name field will automatically display: Harry Potter
 

Example 2 – Calculate an Invoice Total

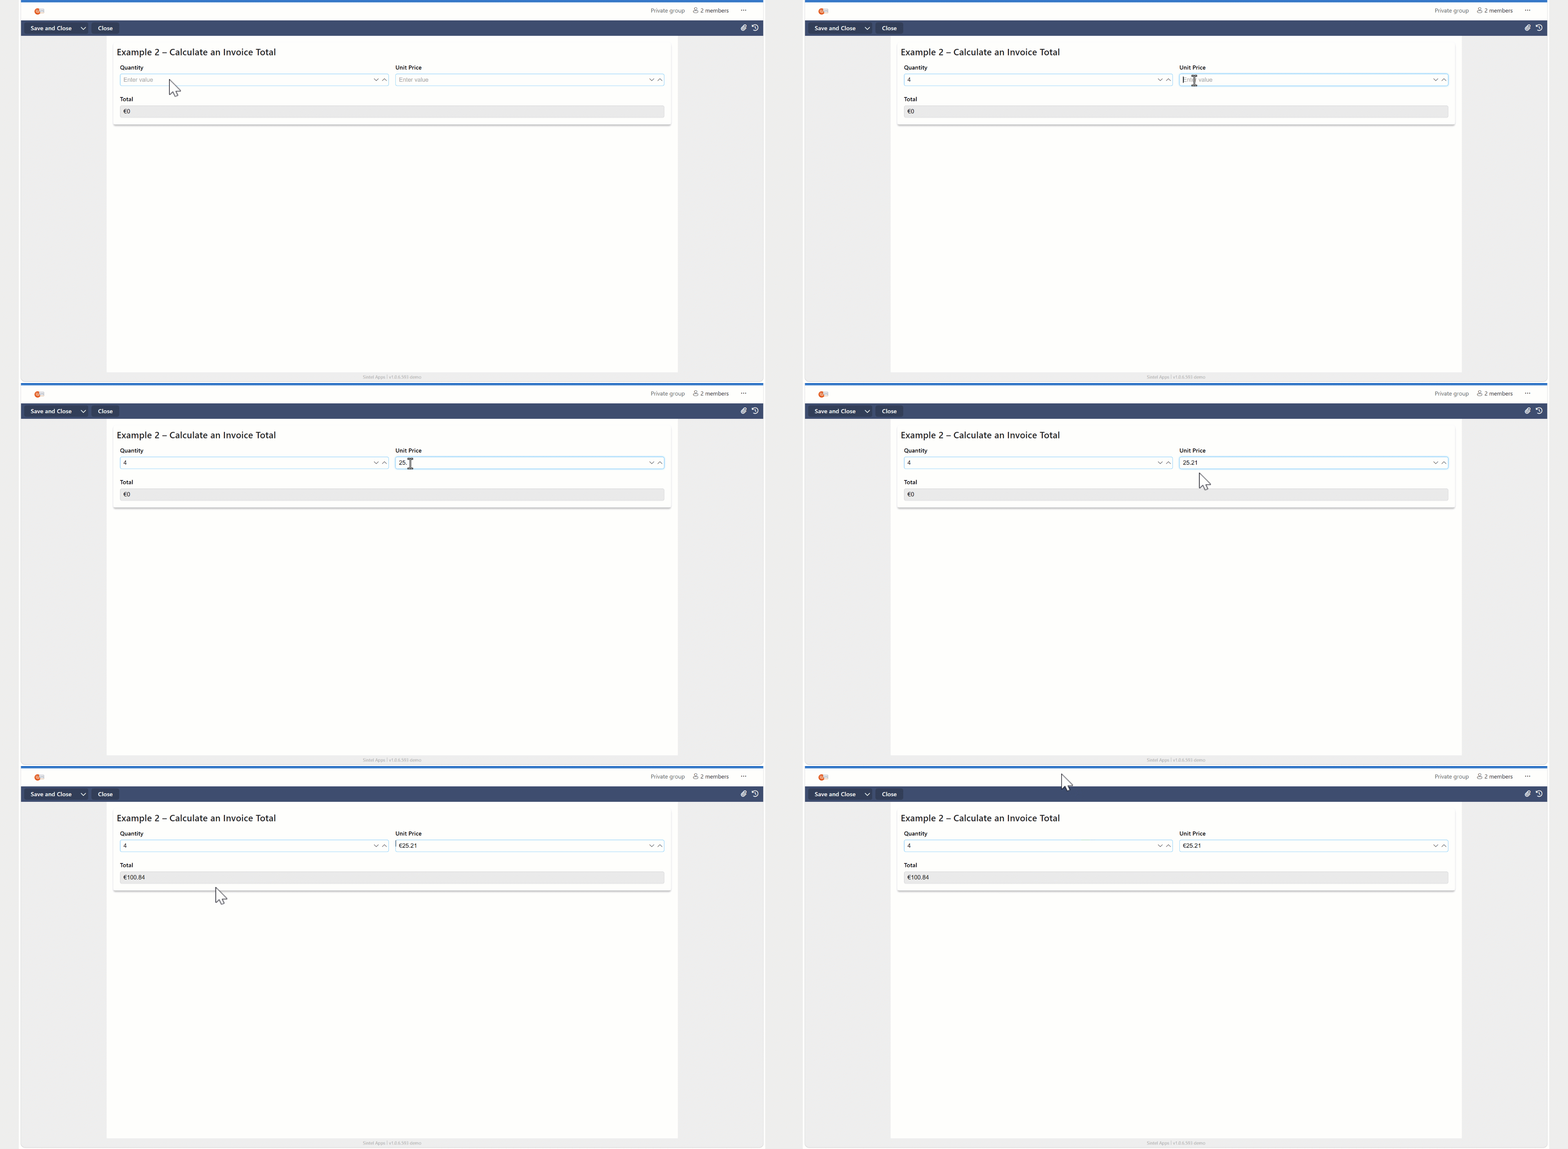
You want to automatically calculate the total price by multiplying the quantity by the unit price.

Form Setup

Create the following fields:

Field Type Display Name Internal Name
Number Quantity Quantity
Currency Unit Price UnitPrice
Currency Total Total

Open the Total field, enable Calculated, and enter the formula:

{{Quantity}} * {{UnitPrice}}


Result
Example 3 – Calculate Days Open

You want to display how many days have passed since the request was created.

Form Setup

  1. Create a Date field at the start of the form.
    • Set the Default Value to Today.
    • When the author first creates the form, this field will automatically be populated with the creation date.
  2. Add a Number field named Days Open.
    • Enable Calculated.
    • Enter the following formula:
    • Math.floor((new Date() - new Date({{Created}})) / (1000 * 60 * 60 * 24))
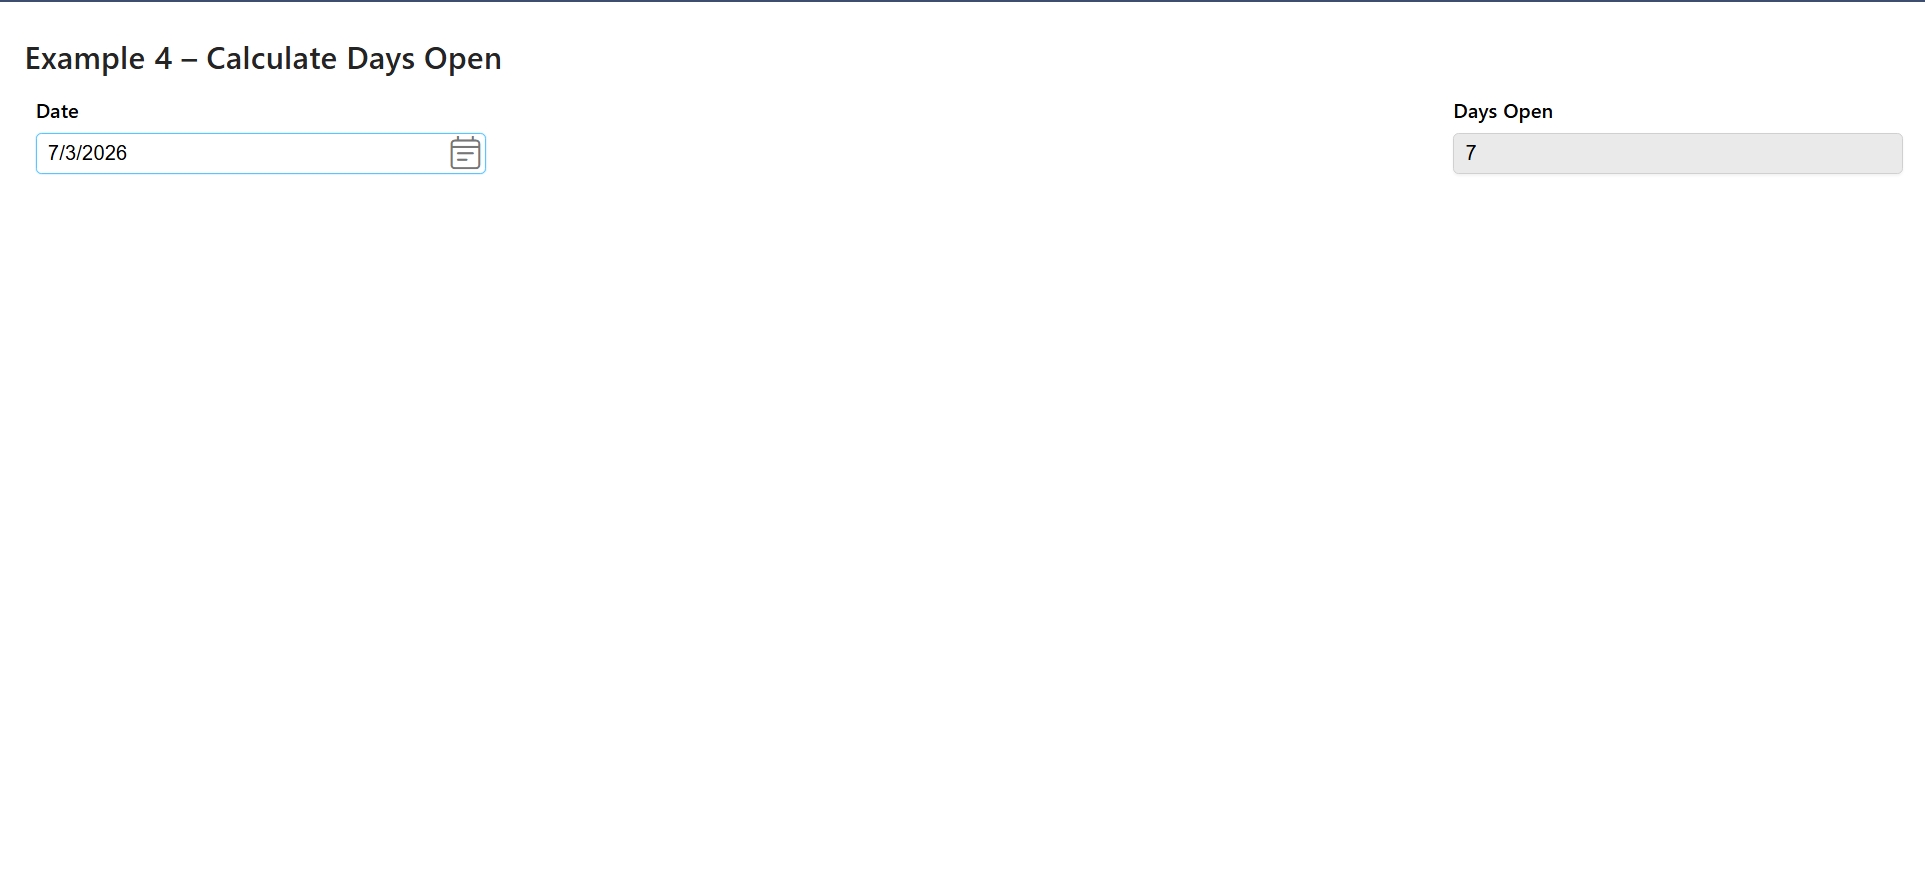
       

Result

Example 4 – Automatically Determine the Urgency of a Request

In the previous example, we created a calculated field called Days Open that displays how many days have passed since a request was created.

We can now use that calculated value to automatically determine the urgency of the request.

This is particularly useful for Help Desk, Service Desk and Support forms where requests become more urgent the longer they remain unresolved.

Form Setup
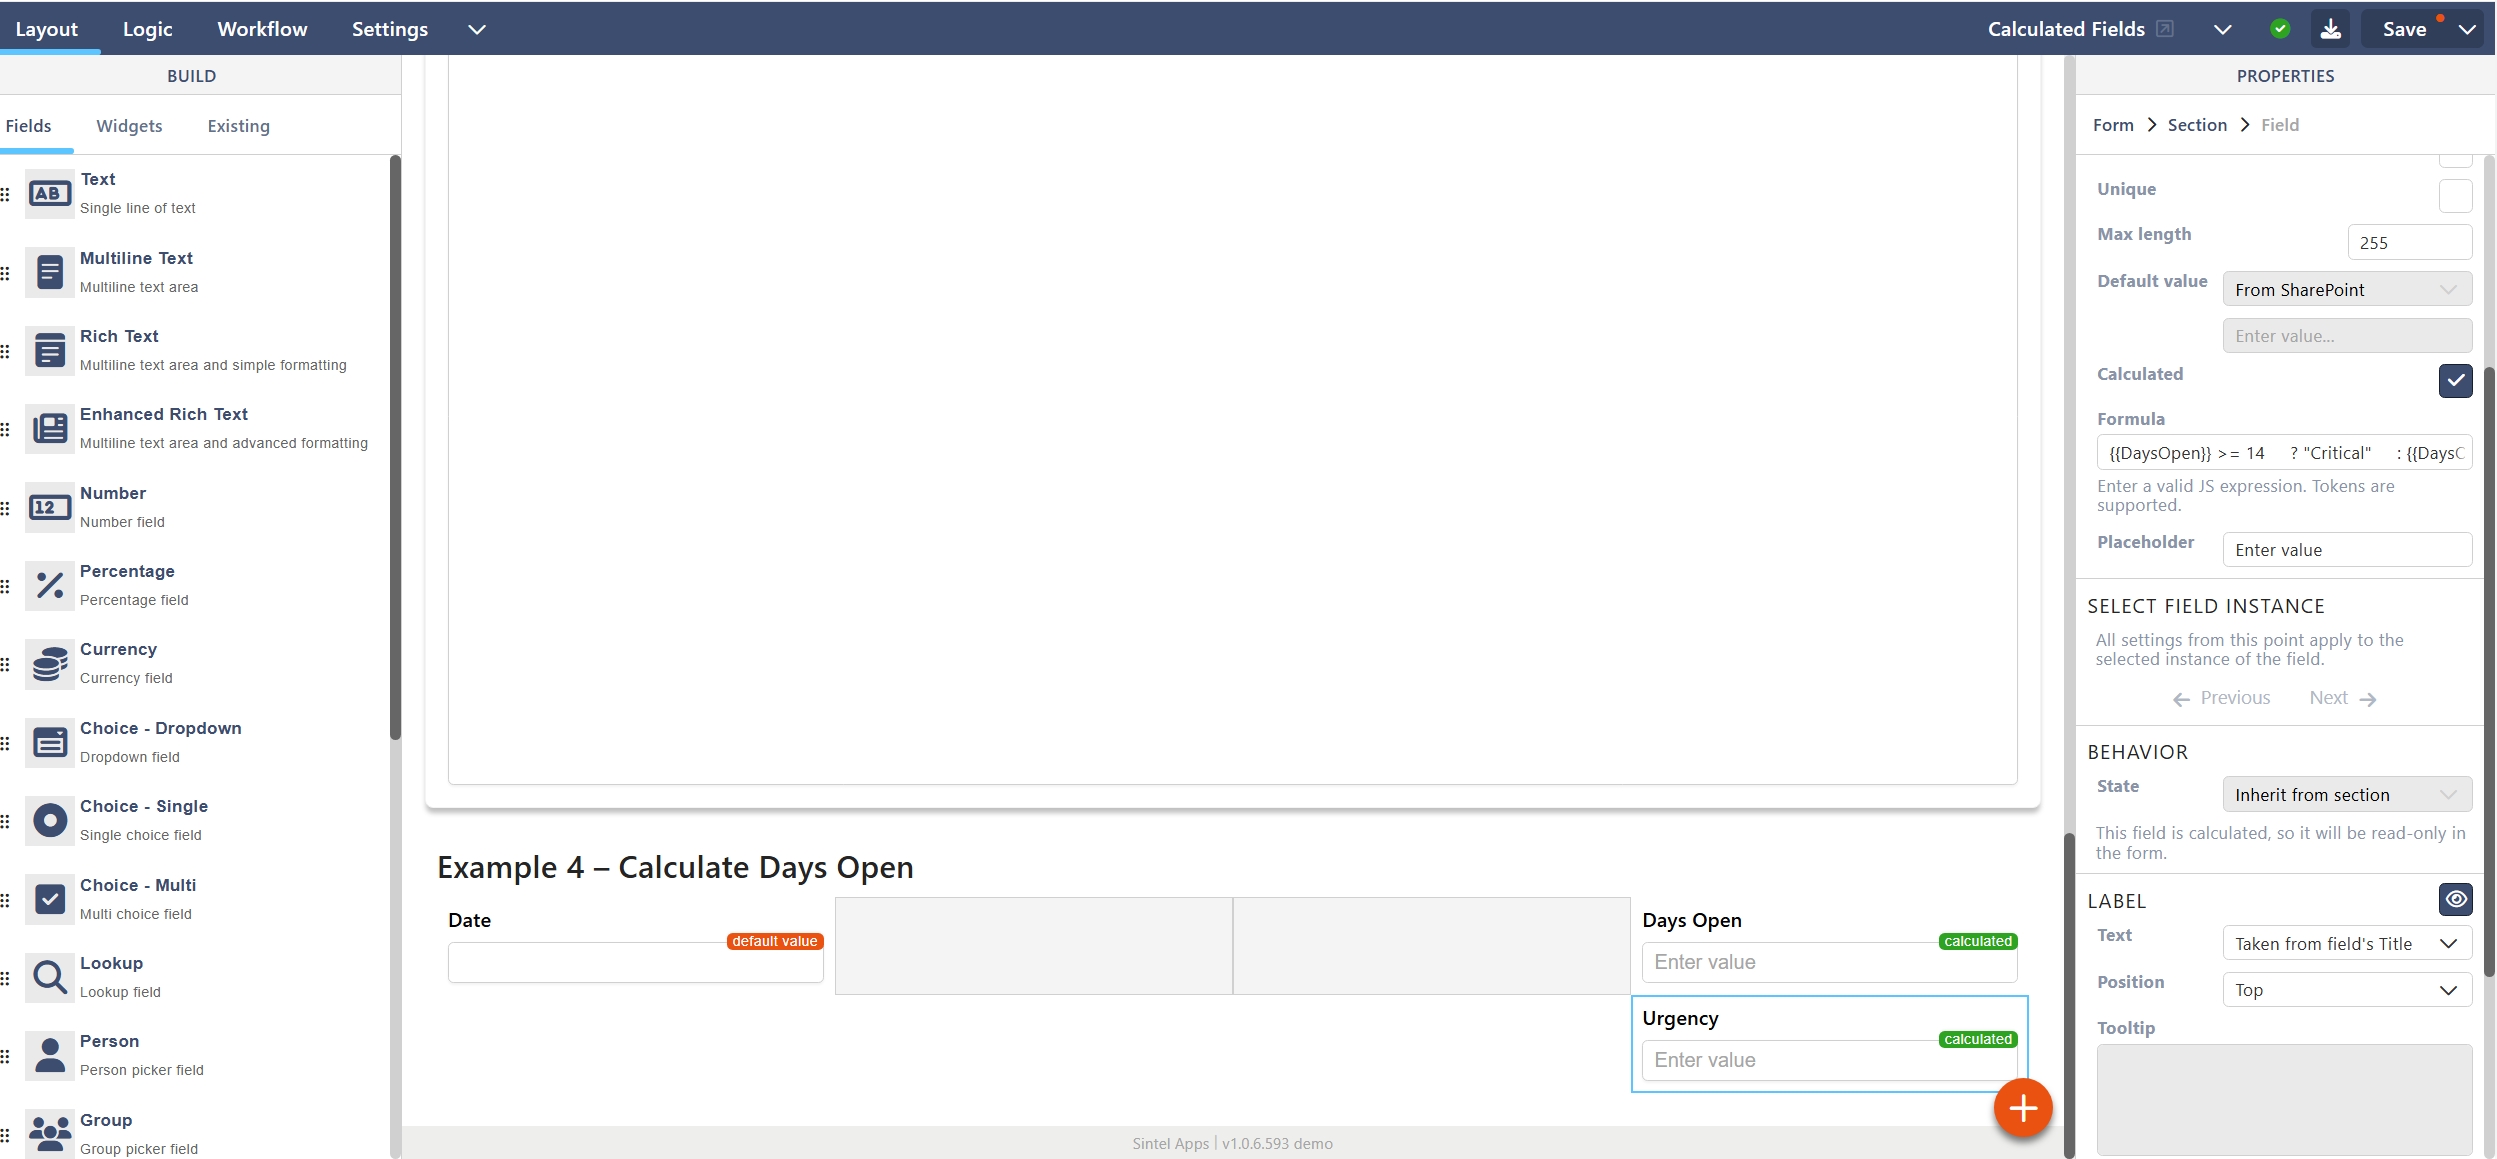
Using the Days Open calculated field created in the previous example, add a new Single Line of Text field.

Field Type Display Name Internal Name
Number Days Open DaysOpen
Text Urgency Urgency
Open the Urgency field, enable Calculated, and enter the following formula:
{{DaysOpen}} >= 14
    ? "Critical"
    : {{DaysOpen}} >= 7
        ? "High"
        : {{DaysOpen}} >= 3
            ? "Medium"
            : "Low"

As the number of days increases, the urgency level is automatically updated. Because the Urgency field is itself calculated, users cannot change it manually, ensuring requests are prioritised consistently.
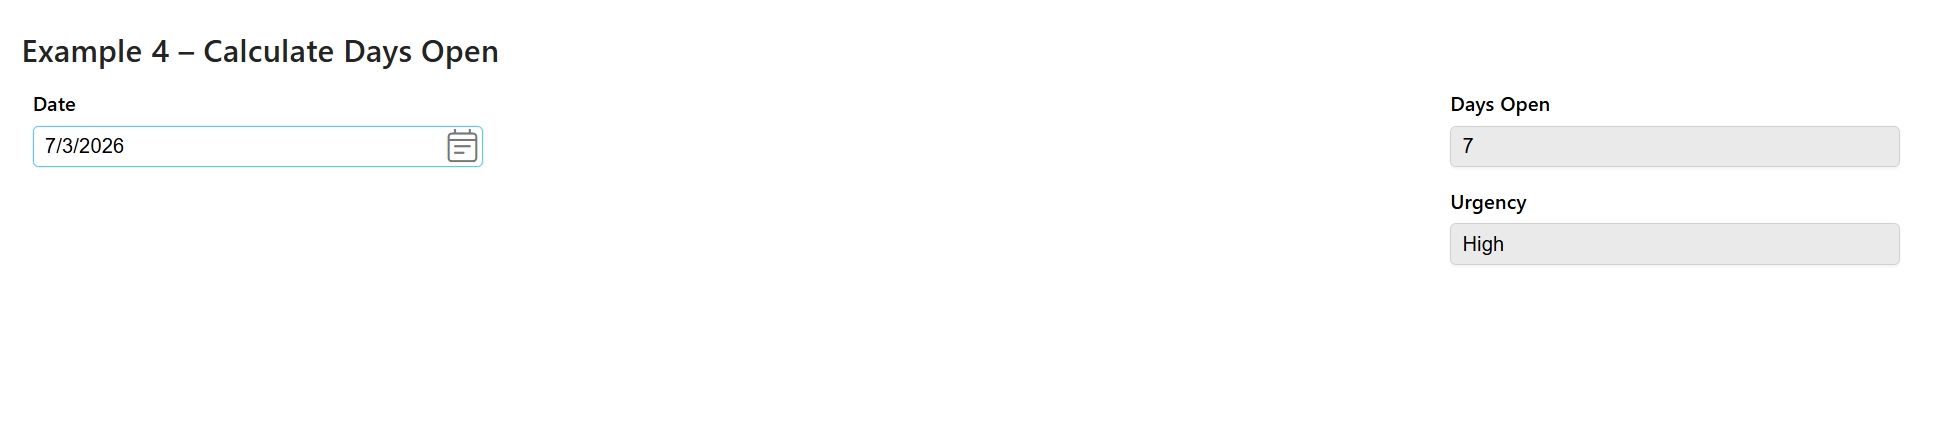

Result:
Was this article helpful?
0 out of 5 stars
5 Stars 0%
4 Stars 0%
3 Stars 0%
2 Stars 0%
1 Stars 0%
5
Please Share Your Feedback
How Can We Improve This Article?
Table of Contents

Sintel Apps

Create apps on Microsoft 365 in minutes with no code.

Address

River House
Blackpool Park,
Cork, T23 R5TF,
Ireland

Support

  • Product help
  • Community site
  • Submit a ticket
  • Compare us

    Contact us to

    • Book a demo
    • Request a license
    • Become a partner

    e-mail: info@sintelapps.com
    tel: +353 (0) 21 245 2935

    Follow us

    • Follow
    • Follow
    • Follow

    © Copyright 2026 | End User License Agreement | Privacy Policy | Terms Of Use

    Sintel Apps
    Sintel Apps Assistant
    Get instant answers and support
    Connecting to Sintel Apps Assistant…
    Sintel is thinking…
    We use cookies to collect and analyse information about the users of this website. Please click 'I accept' to consent to the use of this technology.