Try it
  • Examples
  • Features
  • Testimonials
  • Partners
  • Pricing
  • Support
    • Sintel Apps Help
    • Sintel Apps Release History
    • Sintel BI Help
    • Sintel BI Release History
    • Webinars
    • How to video series
    • Ask the community
    • Submit a ticket
    • Request a demo
    • Compare us
  • Blog
  • Examples
  • Features
  • Testimonials
  • Partners
  • Pricing
  • Support
    • Sintel Apps Help
    • Sintel Apps Release History
    • Sintel BI Help
    • Sintel BI Release History
    • Webinars
    • How to video series
    • Ask the community
    • Submit a ticket
    • Request a demo
    • Compare us
    • For Schools
  • Blog
  • Get Started
How can we help?

Search for answers or browse articles about Sintel Apps

Filter by categories Clear Results
  • About Sintel Apps

    • What is Sintel Apps? (Product Overview)
    • Understanding the Underlying SharePoint List
  • Sintel Forms to Sintel Apps Migration

    • Sintel Forms Is Now Sintel Apps – What You Need to Do
    • Upgrading from Sintel Forms to Sintel Apps – Migration Guide
    • JavaScript API Differences Between Sintel Forms and Sintel Apps
    • Migrating Workflow History using a custom Microsoft Flow
    • What Does Not Migrate Automatically
    • Migration Checklist
    • Information for IT Administrators – Installing Sintel Apps
    • How to Find Existing Sintel Forms in SharePoint
    • Convert a classic SharePoint site to a modern one
  • Getting Started

    • Add Sintel Apps to Your Microsoft 365 Tenant
    • Configure Sintel Apps on a Site
    • Using Site Collection App Catalogs
  • Designer Overview

    • Sintel Apps Designer – Overview (Tour)
    • Layout Tab (Overview)
    • Workflow Tab (Overview)
    • Settings Tab (Overview)
    • Logic Tab: Create your First Rule (Overview)
  • Layout

    • Layout Tab (Overview)
    • Calculated Fields
    • Fields

      • Text Fields (All types explained)
      • Choice Fields (Dropdown vs Multi-Choice)
      • Lookup Fields
      • Person and Group Fields Posted
      • Number, Currency & Percentage Fields
      • Yes/No Field
      • Date & Date Time Fields
      • Hyperlink Field
      • Picture Fields
      • Related List
      • Related Library
      • Enhanced Rich Text Editor
    • Widgets

      • Attachments
      • HTML Widget
      • Workflow Status Widget
      • Workflow History Widget
      • Buttons
    • Theme

      • Data Import Export
      • Theme & Styling
  • Logic

    • Logic Tab: Create your First Rule (Overview)
    • Understanding Conditions
    • Understanding Steps
    • The JavaScript API

      • Using the JavaScript API in Logic
  • Workflow

    • Workflow Tab (Overview)
    • How to Build Common Workflow Patterns in Sintel Apps
    • How to Configure Workflow Email Notifications
    • Actions

      • The Workflow Actions API Integration
      • Workflow Actions – Configuration and Settings
      • Configuring Power Automate Webhook
    • Statuses

      • Workflow Statuses – Configuration and Settings
  • Settings

    • Settings Tab (Overview)
    • PDF Export
    • Conversations
    • After save script
    • Confirmation Screens
    • License Information
    • Upgrade from Sintel Forms
    • Custom Emails
    • Form Viewer

      • Actions Menu Behavior
      • Enable Concurrent Access
      • After save/action redirect to
      • After close redirect to
    • External Access

      • External Access & Sharing
      • Configuring External Access Permissions
  • Product Updates

    • CSP Content Security Policies (CSP) Enforcement for SPFx Apps
    • Sintel Apps Content Delivery Network CDN
    • Release History
    • How to update Sintel Apps
  • Building Forms

    • How to Create a New List
  • End-to-End Examples

    • Articles coming soon
  • Checklists & Best Practices

    • Sintel Apps – Project Planning & Best Practices
    • Project Requirements Template
  • Advanced Configurations

    • The Workflow Actions API Integration
    • Using the JavaScript API in Logic
    • Configuring External Access Permissions
  • Troubleshooting

    • Failed to query permissions
    • Convert a classic SharePoint site to a modern one
  • Administration

    • Sintel Apps Email Delivery
< All Topics
You are here:
  • Main
  • Workflow
  • How to Build Common Workflow Patterns in Sintel Apps

How to Build Common Workflow Patterns in Sintel Apps

Posted16 February 2026
Updated16 February 2026
ByAmy Dermody
0 out of 5 stars
5 Stars 0%
4 Stars 0%
3 Stars 0%
2 Stars 0%
1 Stars 0%


This article explains four common workflow patterns used in business solutions and how to build them in Sintel Apps.

Each example includes:

  • When to use it

  • Status structure

  • Actions required

  • Key configuration settings


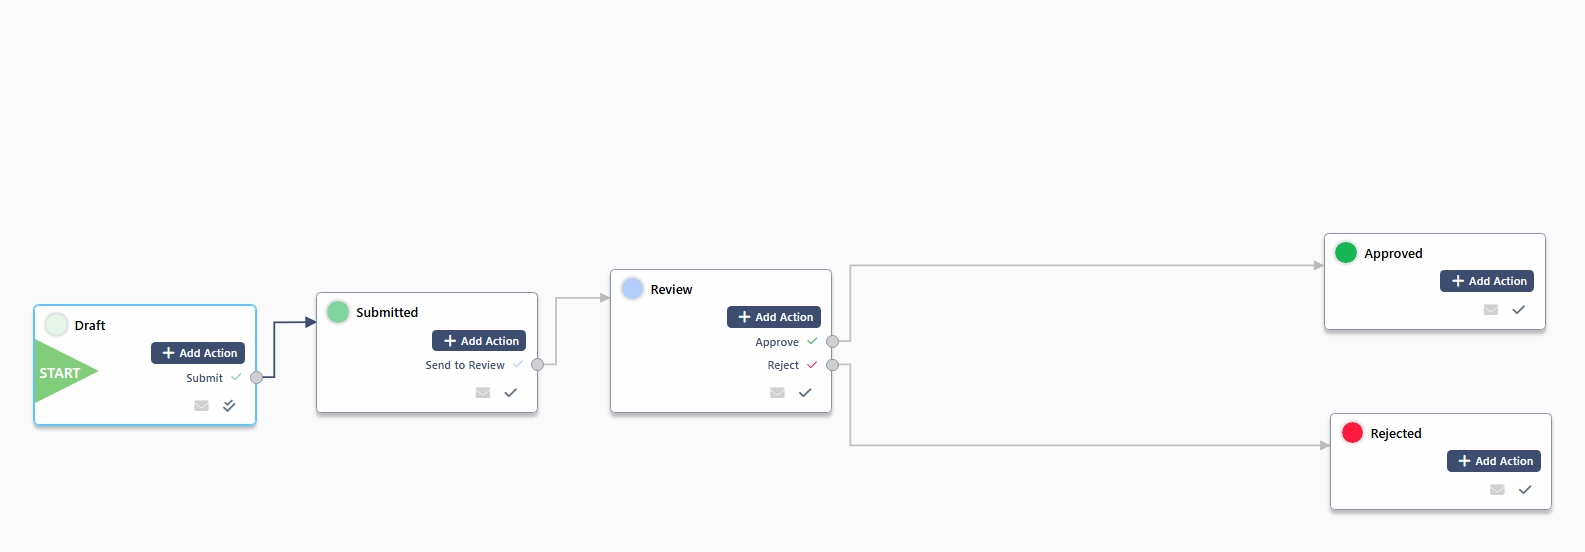
1. Simple Linear Approval

When to Use

  • Standard request forms

  • Low-risk approvals

  • One decision-maker

Examples:
Leave requests, Basic purchase approvals, Access requests
– How to Build It

Step 1 – Create Statuses

Create:

  • Draft (Initial)

  • Submitted

  • Approved

  • Rejected

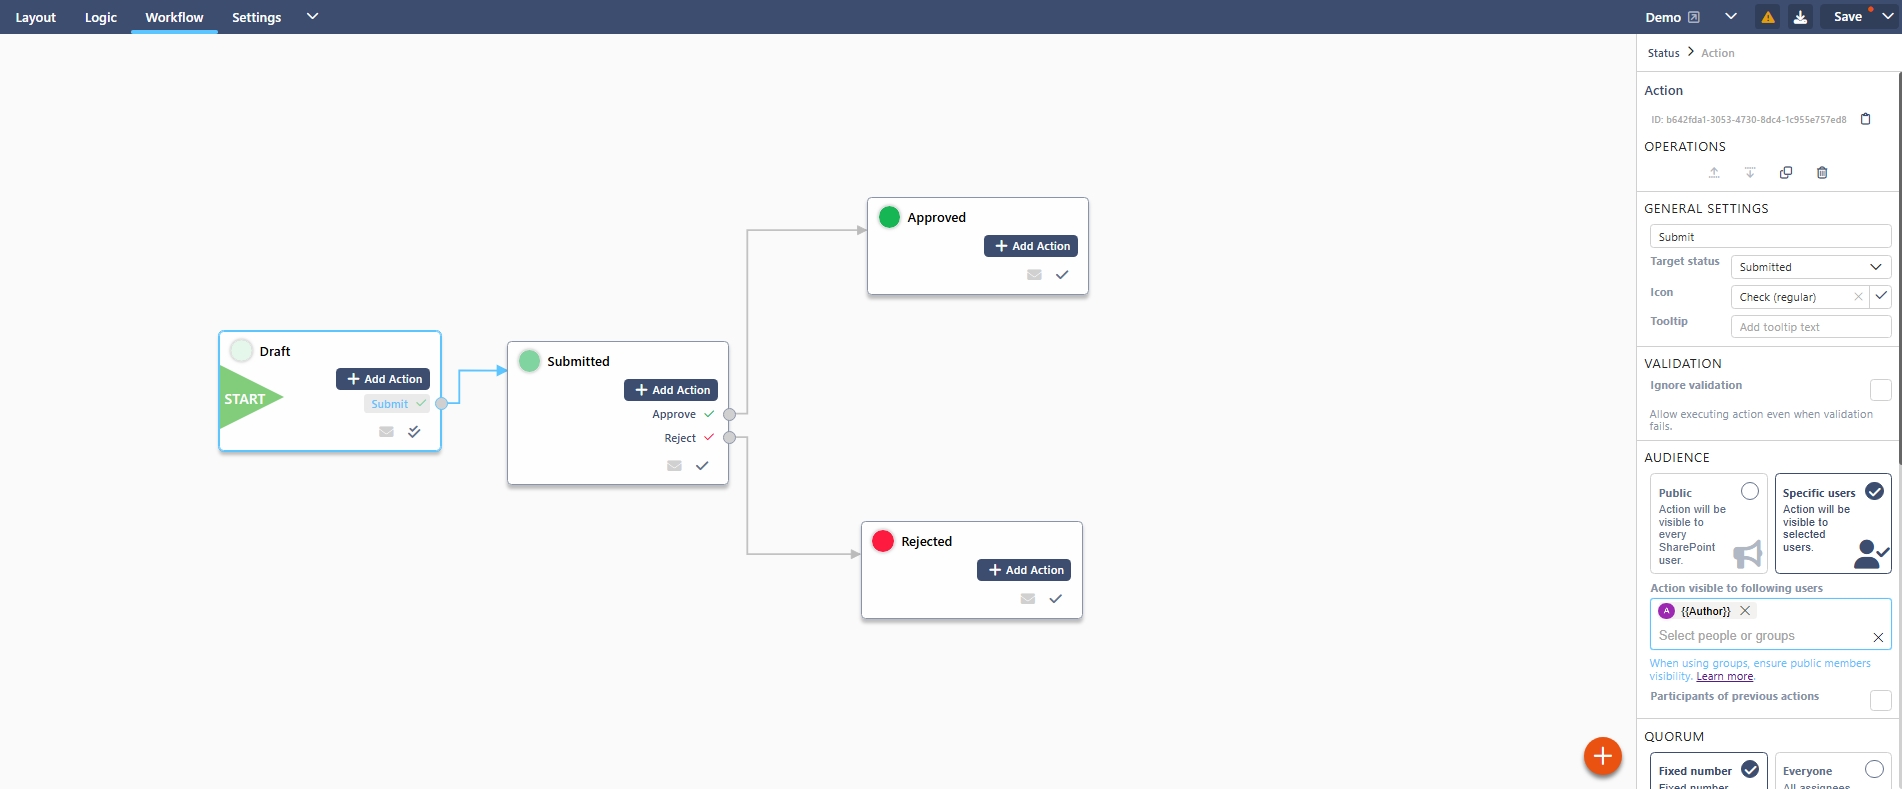
Step 2 – Add Actions

From Draft:

  • Action: Submit

  • Target Status: Submitted

  • Audience: Created By

From Submitted:

  • Action: Approve

  • Target Status: Approved

  • Audience: Approver group

  • Action: Reject

  • Target Status: Rejected

  • Confirmation: Mandatory comment

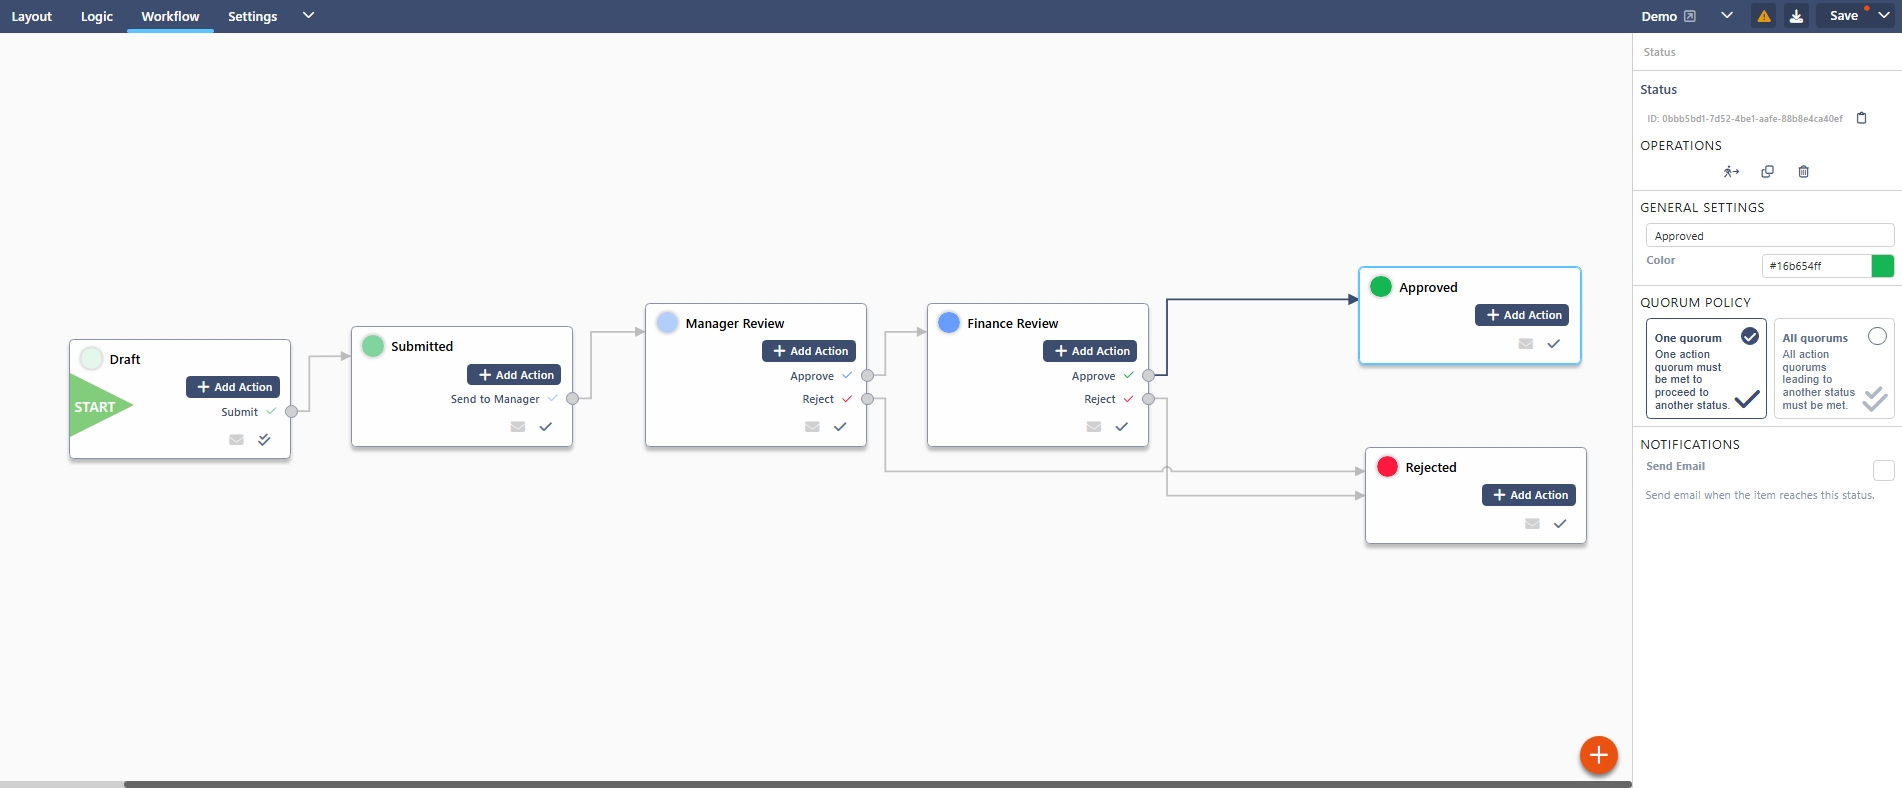
2. Multi-Level Approval

When to Use

  • Financial approvals

  • HR processes

  • Procurement

  • Any approval with hierarchy

– How to Build It

Step 1 – Create Statuses

  • Draft (Initial)

  • Submitted

  • Manager Review

  • Finance Review

  • Approved

  • Rejected

Step 2 – Configure Actions

From Draft: Submit → Submitted

From Submitted: Send to Manager → Manager Review (Audience: Manager)

From Manager Review: Approve → Finance Review and  Reject → Rejected

From Finance Review: Approve → Approved and Reject → Rejected


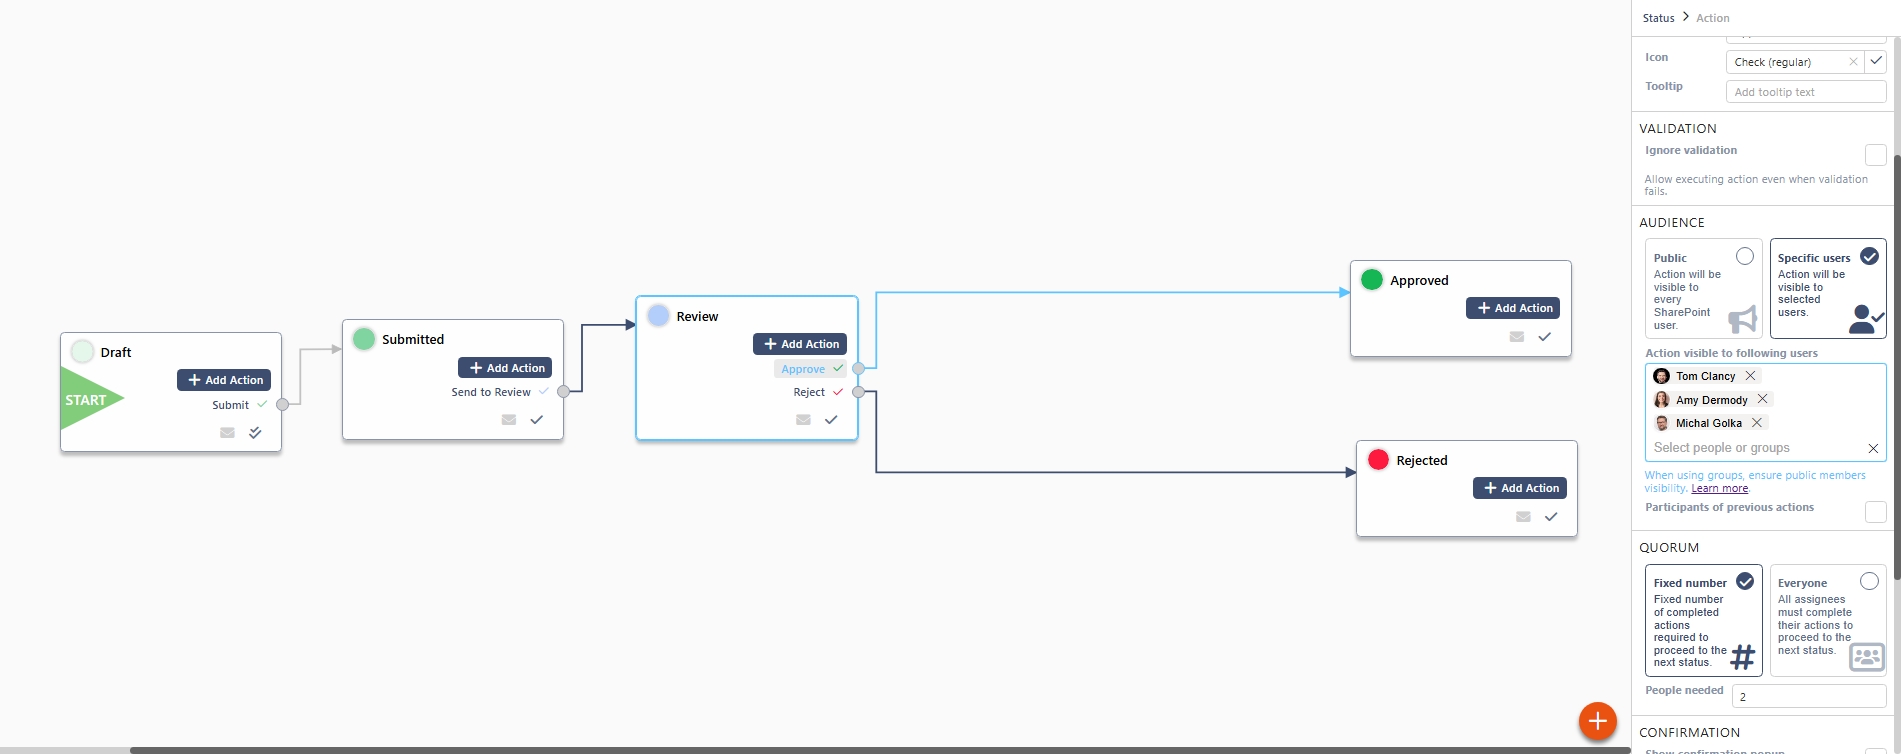
3. Parallel Approval (Quorum-Based)

When to Use

  • Committee approvals

  • Risk boards

  • Compliance sign-off

  • Multi-reviewer validation

– How to Build It

Step 1 – Create Statuses

  • Draft (Initial)

  • Submitted

  • Review

  • Approved

  • Rejected

Step 2 – Configure Review Status

From Submitted: Action: Send to Review and Target: Review

From Review:

Action: Approve
Audience: Specific Users (add multiple users or a group)
Quorum: Fixed number (e.g. 2) OR Everyone

Target Status: Approved

Add Reject action → Rejected
4. Conditional Approval (Threshold-Based)

When to Use

  • Financial limits

  • Risk scoring

  • Category-based routing

  • Policy-driven processes

Example Scenario

If Amount > £10,000 → Require Director Approval
If Amount ≤ £10,000 → Skip Director stage

– How to Build It
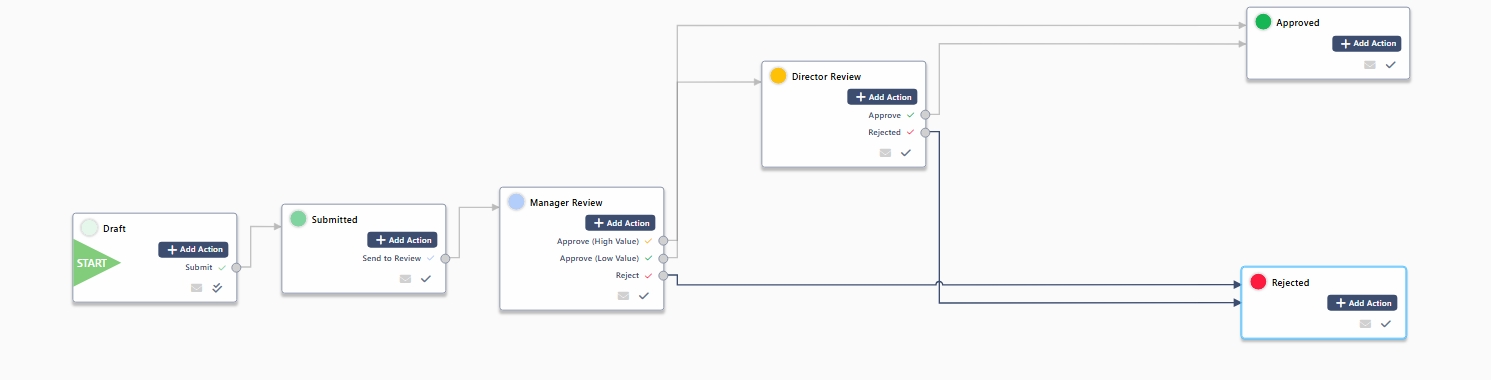
Step 1 – Create Statuses

  • Draft

  • Submitted

  • Manager Review

  • Director Review

  • Approved

  • Rejected

Step 2 – Configure Workflow Transitions

In Manager Review, create two separate approval actions:

  1. Approve (High Value)
    Next Status → Director Review


  • Approve (Low Value)
    Next Status → Approved


Also create: Reject

Next Status → Rejected

At this stage, the workflow contains both possible approval paths.
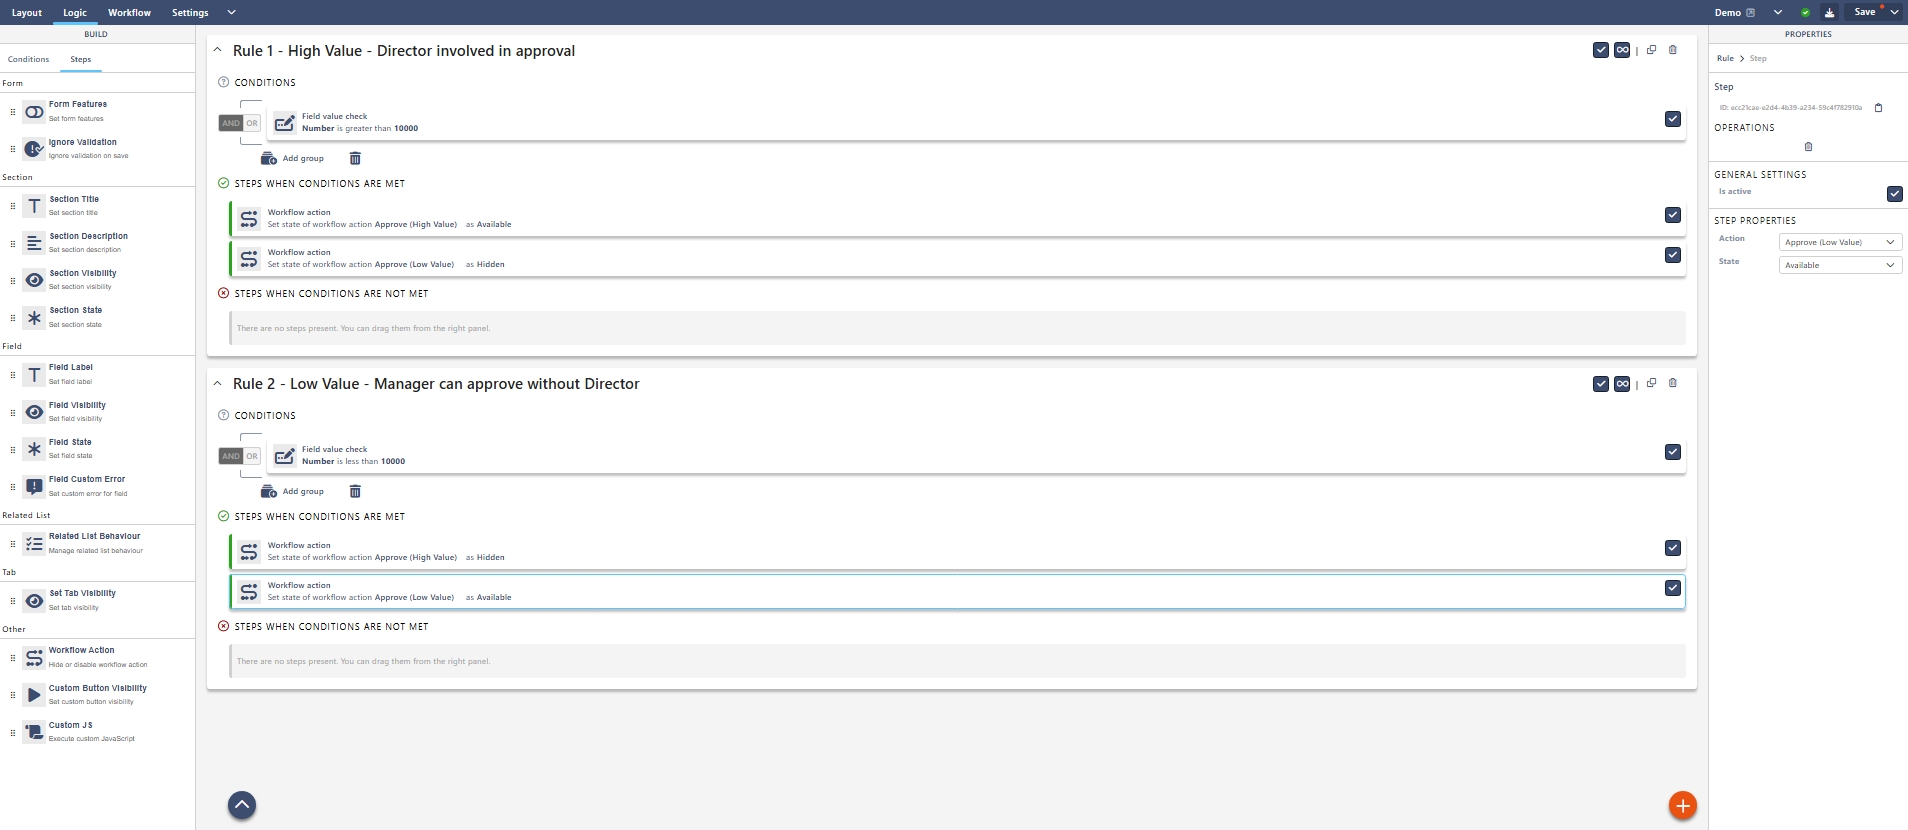
Step 3 – Add Logic to Control Visibility

Go to the Logic tab.

Now create rules that control which approval action is visible based on the Amount field.

Rule 1 – High Value

Condition:
Amount > 10000

The condition will be Field Value Check – Number is Greater than 10,000

Steps when conditions are met:

  • Show workflow action → Approve (High Value)

  • Hide workflow action → Approve (Low Value)


Rule 2 – Low Value

Condition:
Amount ≤ 10000

The condition will be Field Value Check – Number is less than 10,000

Steps when conditions are met:

  • Show workflow action → Approve (Low Value)

  • Hide workflow action → Approve (High Value)


What Happens in Practice

At Manager Review:

If Amount = £15,000
→ Only “Approve (High Value)” is visible
→ Routes to Director Review

If Amount = £5,000
→ Only “Approve (Low Value)” is visible
→ Routes directly to Approved

The routing feels automatic, but it is controlled by action visibility rules.

Tip: Keep the Button Label Clean

You don’t have to expose “High Value” or “Low Value” in the action name to end users.

Instead:

  1. Add the Buttons widget to your form.
  2. Add two Action Buttons.
  3. Link each button to: Approve (High Value) and Approve (Low Value)
  4. Edit both button labels so they simply display: Approve

Users will only ever see a single Approve button but behind the scenes it routes differently depending on the threshold.

Was this article helpful?
0 out of 5 stars
5 Stars 0%
4 Stars 0%
3 Stars 0%
2 Stars 0%
1 Stars 0%
5
Please Share Your Feedback
How Can We Improve This Article?
Table of Contents

Sintel Apps

Create apps on Microsoft 365 in minutes with no code.

Address

River House
Blackpool Park,
Cork, T23 R5TF,
Ireland

Support

  • Product help
  • Community site
  • Submit a ticket
  • Compare us

    Contact us to

    • Book a demo
    • Request a license
    • Become a partner

    e-mail: info@sintelapps.com
    tel: +353 (0) 21 245 2935

    Follow us

    • Follow
    • Follow
    • Follow

    © Copyright 2026 | End User License Agreement | Privacy Policy | Terms Of Use

    Sintel Apps
    Sintel Apps Assistant
    Get instant answers and support
    Connecting to Sintel Apps Assistant…
    Sintel is thinking…
    We use cookies to collect and analyse information about the users of this website. Please click 'I accept' to consent to the use of this technology.